The Macro Pro Method
How It Works
The system is designed to be explored at your own pace. The first step is completely open. It covers the foundational principles behind the entire process, so you can understand how the system works before committing to anything.
From there, access is structured across three tiers depending on how far you want to take it. Tier one unlocks the complete 10-step nutrition guide along with Macro Pro and Check-In Pro, the two built-in tools that calculate your targets, generate meal plans, and track your daily progress. Tier two adds three structured 8-week training programs with built-in session logging. Tier three includes everything plus a one-on-one coaching consultation, personalised nutrition and training plans, and 7-day implementation support with 24/7 WhatsApp access.
Structure is the strategy, and every part of this system is built around that principle.

Understanding the Process
Before any numbers are calculated or any plan is built, it is important to understand what actually drives results. Most people approach nutrition as a set of isolated actions. They adjust calories, change foods, or follow a plan, and expect a predictable outcome. When that outcome does not appear, the assumption is that something is wrong with the plan. In most cases, the issue is not the plan itself. It is a lack of understanding of the process the plan sits within.
Nutrition is central, but it does not operate in isolation. The outcome you see over time is influenced by multiple factors working together. Daily movement, structured training, sleep quality and duration, stress levels, hydration, and overall routine all influence both behaviour and how your body responds. These variables affect how much energy you use, how consistently you follow the plan, and how clearly your results can be interpreted.
When these factors are stable, progress becomes more predictable. When they are inconsistent, they introduce noise into the system. Changes in bodyweight may reflect hydration, digestion, or stress rather than actual changes in body composition. Performance in training may fluctuate due to fatigue rather than energy intake. Hunger and adherence may vary depending on sleep and routine. Without recognising this broader context, it becomes difficult to determine whether the plan is working or whether the surrounding variables are affecting the outcome.
At the centre of this process is energy balance.
Your body requires a certain amount of energy each day to maintain its current state. This forms the baseline from which all change occurs. If energy intake is aligned with this level, bodyweight remains relatively stable over time. If intake consistently moves above or below it, bodyweight will change. This is not a theory. It is a physiological constraint that applies in all scenarios.
That baseline is not a fixed number. It is an estimate based on your personal data and activity levels. It provides a structured starting point that must be tested and refined through real-world execution. The objective is not to find a perfect number immediately, but to establish a direction that can be adjusted as more data becomes available.
This is where the distinction between a process and a system becomes important. The process is the sequence used to set your nutrition correctly. It is how you establish your starting point, define your goal, and structure your intake. The system is what allows that process to continue working over time. It is how you monitor your behaviour, interpret your data, and adjust your plan as your body and circumstances change.
Without the process, there is no direction. Without the system, there is no progression.
What follows is designed to integrate both. Each step builds on the previous one, moving from establishing awareness, to setting structure, to executing consistently, and finally to refining the plan based on evidence. The objective is not to create a perfect plan on day one, but to create a framework that allows you to manage progress with clarity and control.
This is where that process begins.
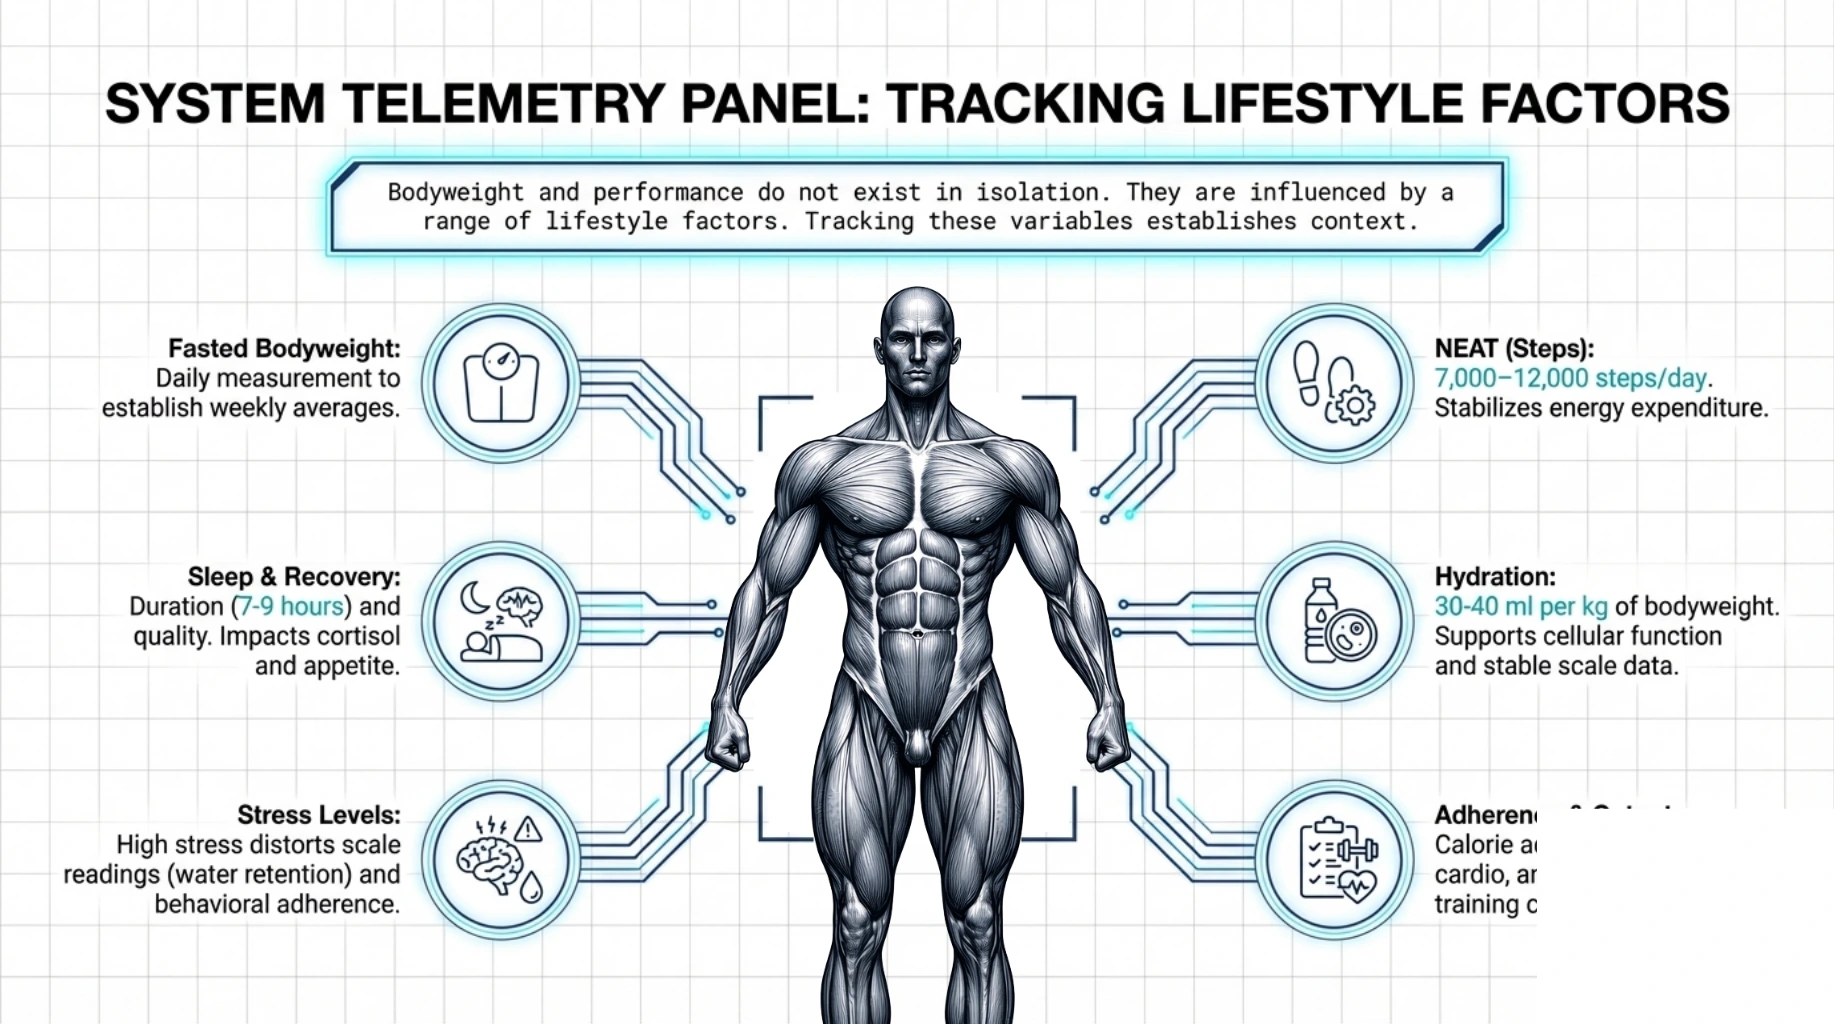
Step 1: Tracking Lifestyle Factors
Before any meaningful adjustments can be made to calorie intake or activity levels, the conditions surrounding those inputs must be understood. Bodyweight, performance, and overall progress do not exist in isolation. They are influenced by a range of lifestyle factors that affect how the body responds to nutrition and training on a day-to-day basis.
Tracking these variables establishes context. Without it, changes in bodyweight or performance can be misinterpreted, leading to unnecessary or incorrect adjustments. When these factors are monitored consistently, patterns begin to emerge. This allows you to separate true progress from temporary fluctuations and make decisions based on reliable information rather than assumption.
The purpose of this step is not to achieve perfection, but to create awareness and consistency. Each variable contributes to the overall picture. When tracked together, they provide the foundation for accurate interpretation in the steps that follow.
Fasted bodyweight is the primary metric used to assess changes in body mass over time. It should be measured daily under consistent conditions, ideally first thing in the morning after using the bathroom and before consuming food or fluids. This reduces variability and improves accuracy. Individual readings will fluctuate due to factors such as hydration, glycogen storage, digestion, and stress. For this reason, daily values should not be assessed in isolation. Weekly averages provide a more reliable indicator of true change and should be used when evaluating progress.
Sleep duration has a direct impact on recovery, hormonal function, appetite regulation, and overall performance. Consistently low sleep can increase fatigue, impair training output, and disrupt hunger signals, making adherence more difficult. A general target of 7 to 9 hours per night is supported by the literature for optimal recovery and performance. Falling below this range on a regular basis introduces unnecessary variability into the system and can influence both behaviour and physiological response.
Sleep quality reflects how restful and uninterrupted your sleep is, regardless of total duration. Poor sleep quality can reduce recovery, increase perceived fatigue, and negatively impact mood and decision-making. This can affect both training performance and dietary adherence. While it is more subjective than sleep duration, consistently low sleep quality should be noted, as it often correlates with increased stress, poor recovery, and reduced overall performance.
Stress has a direct impact on both physiological function and behavioural consistency. Elevated stress levels increase cortisol, which can influence water retention, appetite regulation, sleep quality, and recovery from training. This can distort short-term scale readings and make it harder to interpret whether changes in bodyweight reflect actual progress or temporary fluctuations. From a behavioural standpoint, higher stress is also associated with reduced adherence, poorer food choices, and lower training performance.
Energy levels reflect your perceived ability to perform daily tasks and training. Low energy can indicate insufficient calorie intake, poor sleep, high stress, or inadequate recovery. It can also lead to reduced training intensity and lower daily activity levels, both of which influence overall energy expenditure. Tracking energy provides insight into how sustainable your current setup is and whether adjustments may be required to support consistent output.
Hunger is an important feedback signal, particularly in a calorie deficit. While some level of hunger is expected during fat loss, excessively high or persistent hunger can indicate that the deficit is too aggressive or that food choices are not supporting satiety. Conversely, very low hunger in a surplus may indicate that calorie intake is appropriate or that food selection is highly energy-dense. Monitoring hunger helps assess how manageable the current approach is over time.
Steps represent non-exercise activity thermogenesis (NEAT) and are a key contributor to total daily energy expenditure. Unlike structured training, steps reflect general daily movement and can vary significantly from day to day if not tracked. A consistent daily step count helps stabilise energy expenditure and improves the reliability of your calorie targets. A common target range sits between 7,000 and 12,000 steps per day, depending on individual context, but the key factor is consistency rather than the exact number.
Hydration influences bodyweight, performance, digestion, and overall physiological function. Inconsistent fluid intake can lead to fluctuations in scale weight due to changes in water balance, making it harder to interpret progress. As a general guideline, aim for approximately 30 to 40 millilitres of fluid per kilogram of bodyweight per day, adjusted based on activity level, climate, and individual needs. This requirement should be viewed alongside electrolyte intake - specifically sodium and potassium - to ensure that fluid is effectively retained and used for physiological function rather than simply excreted. Maintaining consistent hydration supports more stable conditions within the system.
Calorie adherence reflects how closely your actual intake matches your planned targets. Without consistent adherence, it becomes impossible to determine whether the plan itself is effective. Variations in intake introduce uncertainty into the data, making it difficult to assess whether changes in bodyweight are due to the plan or inconsistent execution. This is one of the most important variables to track, as it directly influences the validity of all outcomes.
Cardio refers to programmed, deliberate activity rather than general movement. This is separate from steps and represents a controlled input within the plan. Completing programmed cardio sessions ensures that energy expenditure aligns with what has been accounted for in your targets. Inconsistent completion introduces variability and reduces the accuracy of the system. This will be explored further in later steps as part of structured activity.
Training completion reflects whether planned resistance training sessions are being executed as intended. Training is a key driver of muscle retention, performance, and overall body composition. Missed sessions or inconsistent effort can impact progress independently of nutrition. Tracking completion ensures that training remains aligned with the structure of the plan and provides context when assessing outcomes.
Daily notes provide context that cannot be captured through numerical data alone. This includes factors such as travel, illness, disruptions to routine, or unusual stressors. These notes help explain anomalies in data and provide additional insight when reviewing trends over time. While not a measurable variable, they play an important role in interpreting the overall picture.
Together, these variables form the foundation of the system. When tracked consistently, they create a stable and reliable dataset that allows you to interpret outcomes with accuracy rather than assumption. Without this layer, changes in bodyweight, performance, or adherence can be misread, leading to unnecessary or incorrect adjustments. With it, patterns become clear, and decisions can be made with confidence.
This is what turns the process from reactive to controlled. You are no longer guessing why something is happening. You are observing it within a defined context.
In the next step, this foundation is used to establish your inputs. Calorie targets and macronutrient structure are not created in isolation, but are built on top of the conditions you have now made visible.
The complete 10-step guide to calculating your nutrition targets, building your meal structure, and managing your progress over time.
Everything in The Macro Pro Method plus three structured 8-week training programs, a complete training guide, and built-in session logging.
Everything included, plus a personalised one-to-one coaching consultation, a custom nutrition and training program, and 7-day implementation support with 24/7 WhatsApp access.
Step 2: Determining the Inputs
Once you have established awareness of your baseline behaviour, the next step is to define the inputs used to calculate your energy requirements. This is where the process begins to move from observation into structure. The accuracy of everything that follows depends on the quality of the data you provide at this stage.
At a minimum, this includes your age, bodyweight, height, and activity level. These variables are used within established formulas to estimate your energy expenditure and determine your starting point. While this may appear straightforward, this is where many inaccuracies are introduced. Small errors at this stage can carry through the entire process, leading to calorie targets that do not reflect your actual needs.
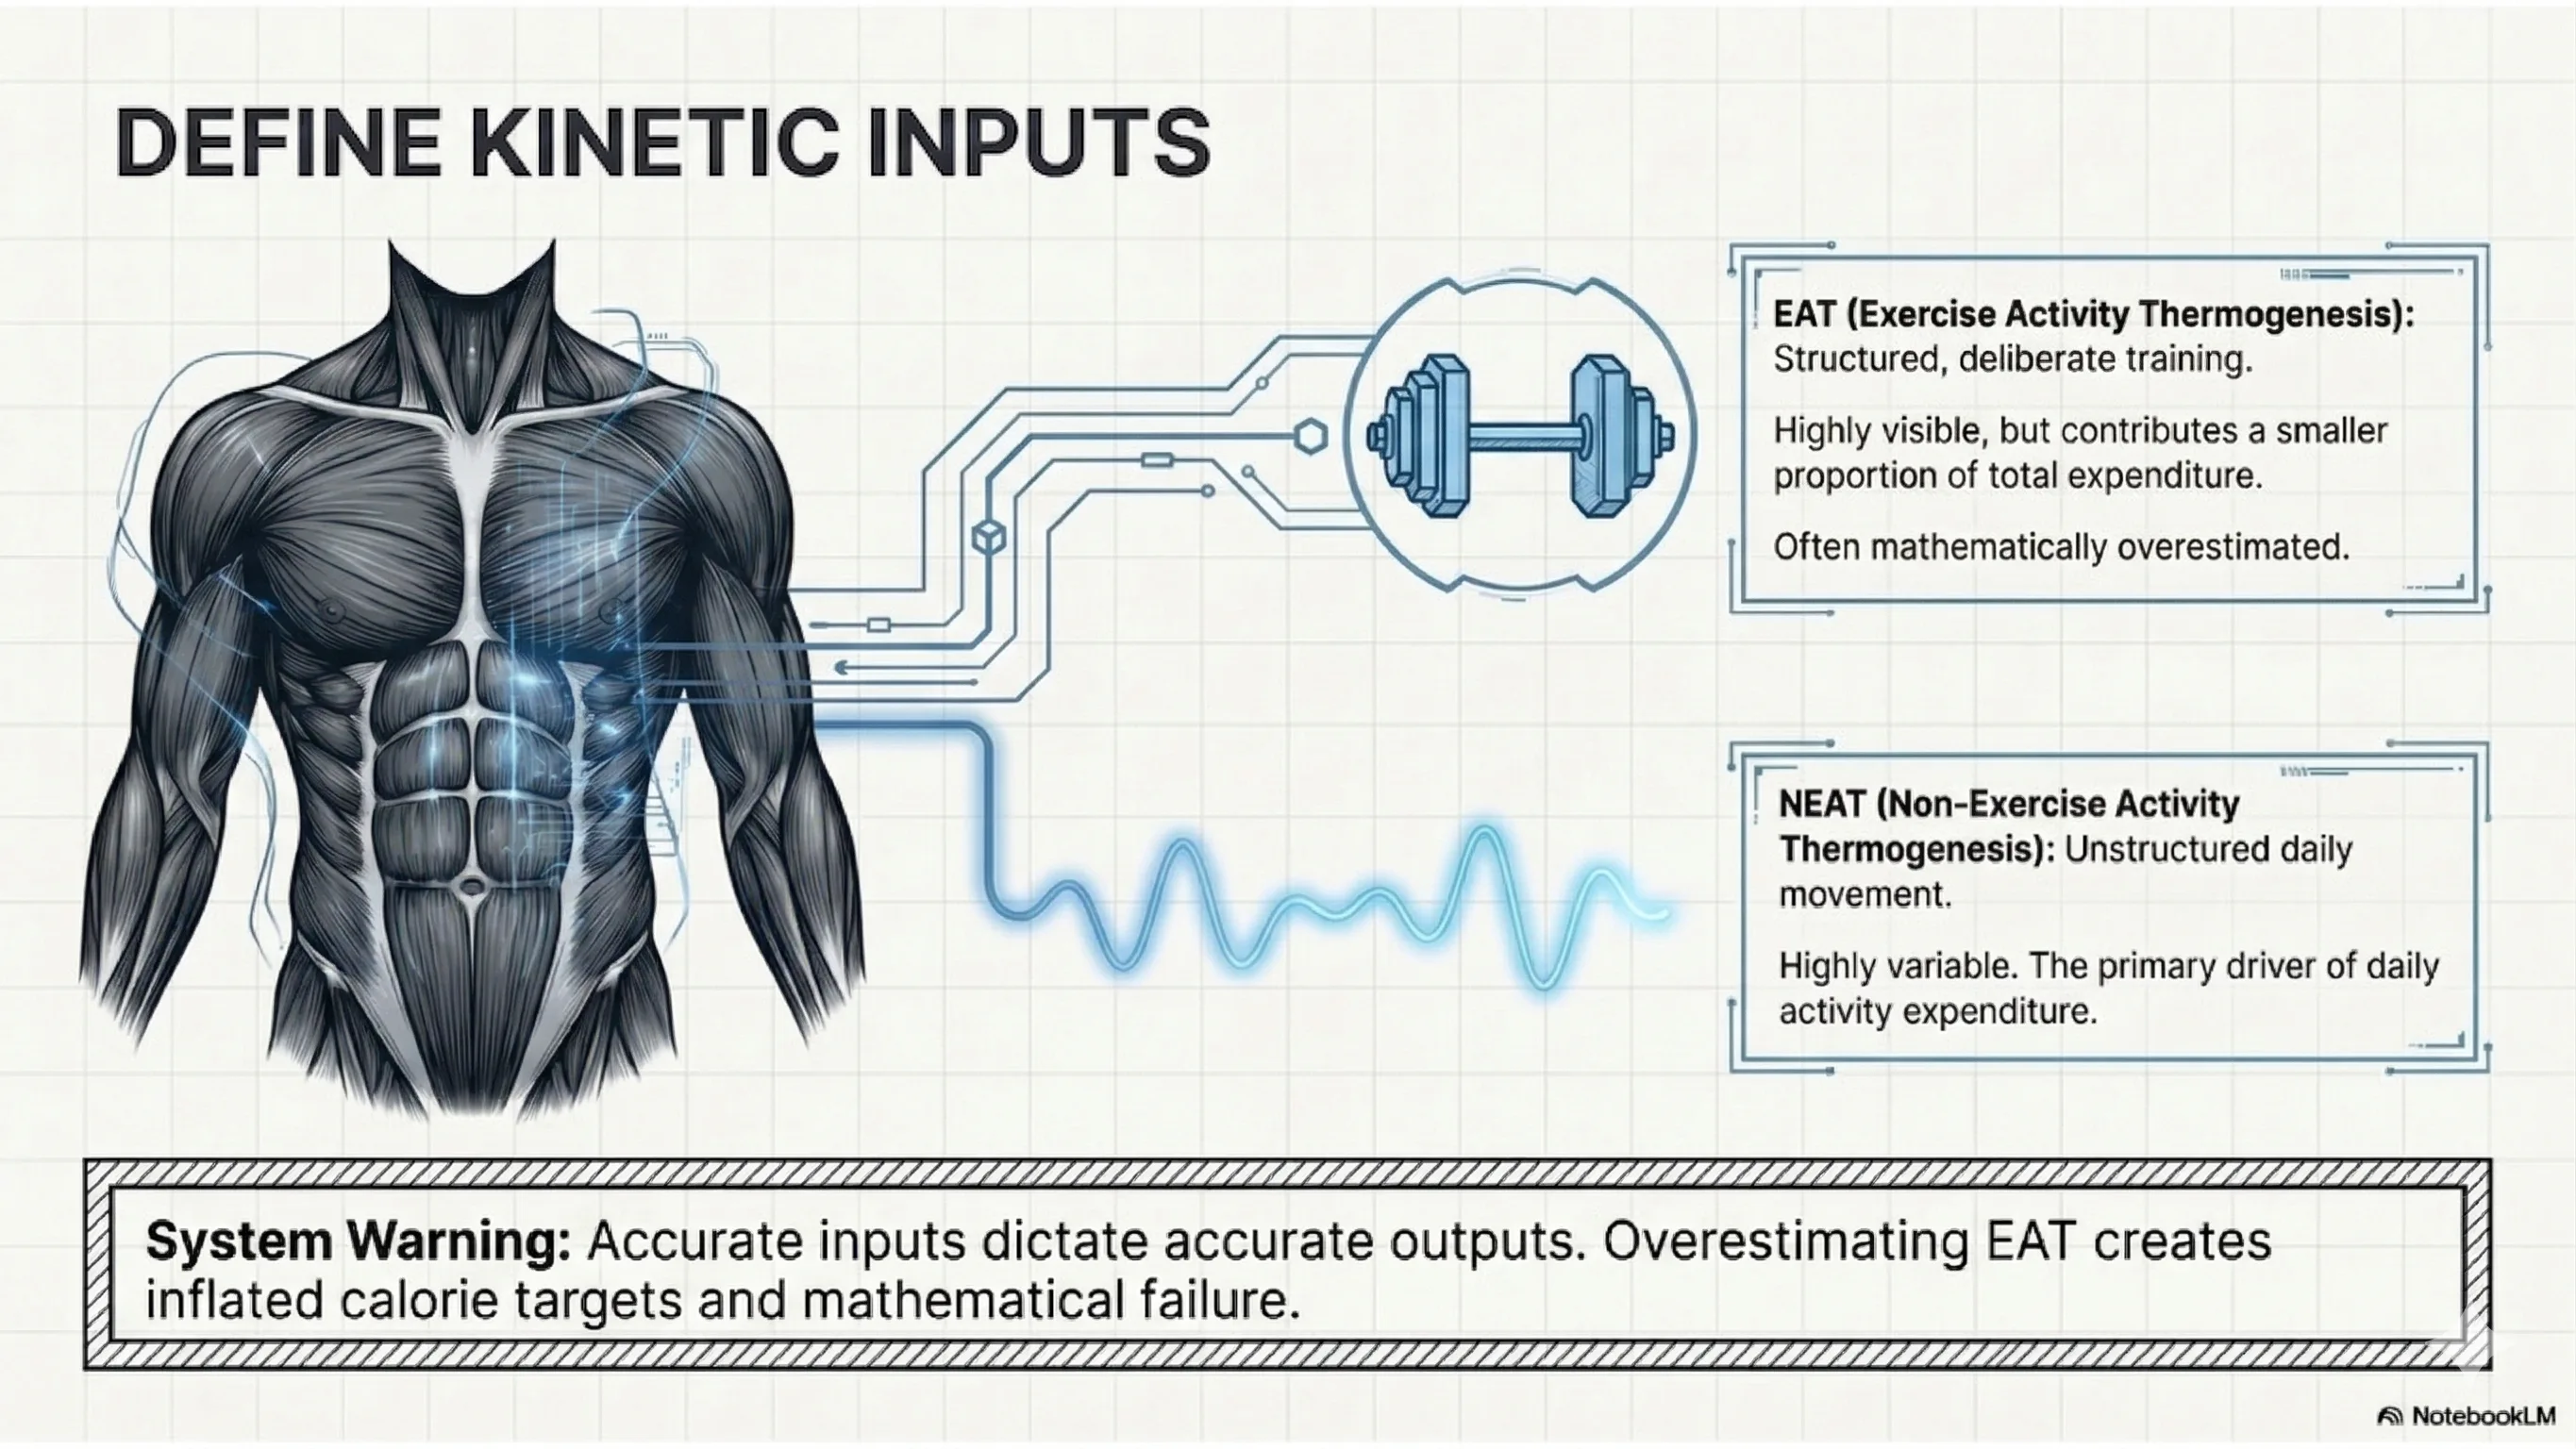
Activity level requires particular attention. Most people tend to overestimate how active they are, especially when training is considered in isolation. A structured workout contributes to energy expenditure, but it is only one part of the total picture. Your daily movement outside of training often has a greater impact on total energy use than the training session itself. This is the distinction between Non-Exercise Activity Thermogenesis (NEAT) and Exercise Activity Thermogenesis (EAT).
NEAT includes all movement outside of deliberate exercise, such as walking, standing, and general activity throughout the day. This can vary significantly between individuals and even from day to day within the same person. EAT refers to structured training, such as gym sessions or cardio. While important, it is often overestimated, particularly when full session duration is assumed to reflect continuous high energy output. In reality, the period of meaningful energy expenditure is typically shorter than the total session time.
Because of this, activity should be assessed conservatively and in context. Overestimating activity leads to inflated calorie targets, which can slow or prevent progress. A more controlled estimate creates a more reliable starting point that can be adjusted later if required.
Where additional data is available, such as body fat percentage, it can be used to refine the calculation. However, this only improves accuracy when the input itself is reliable. Estimated body fat percentages are often inaccurate, particularly when based on visual assessment or generic charts. In these cases, using body fat percentage can reduce accuracy rather than improve it. If body fat percentage is not measured with a reasonable degree of confidence, it is better not to use it. Total bodyweight provides a more consistent input for most people.
It is also important to recognise that different calculation models exist. Some use total bodyweight and are widely applicable across general populations. Others use lean body mass and are more precise when body composition is known. The method itself is less important than ensuring that the inputs align with the method being used.
For individuals significantly above or below a healthy bodyweight range, adjustments to the input weight may be required. Using total bodyweight in these cases can produce unrealistic estimates. Adjusting toward a more appropriate reference point can help create a more practical starting position.
The system cannot produce an accurate output from inaccurate inputs.
This step is not about achieving perfect precision. It is about creating a reliable foundation. The quality of your baseline begins here.
Step 3: Establishing the Baseline
Once your inputs are defined, they are used to calculate your maintenance level. This is your baseline. It represents the total amount of energy your body uses across a typical day and forms the foundation from which all change occurs. Every adjustment you make later in the process is built from this point, which makes this one of the most important steps in the entire system.
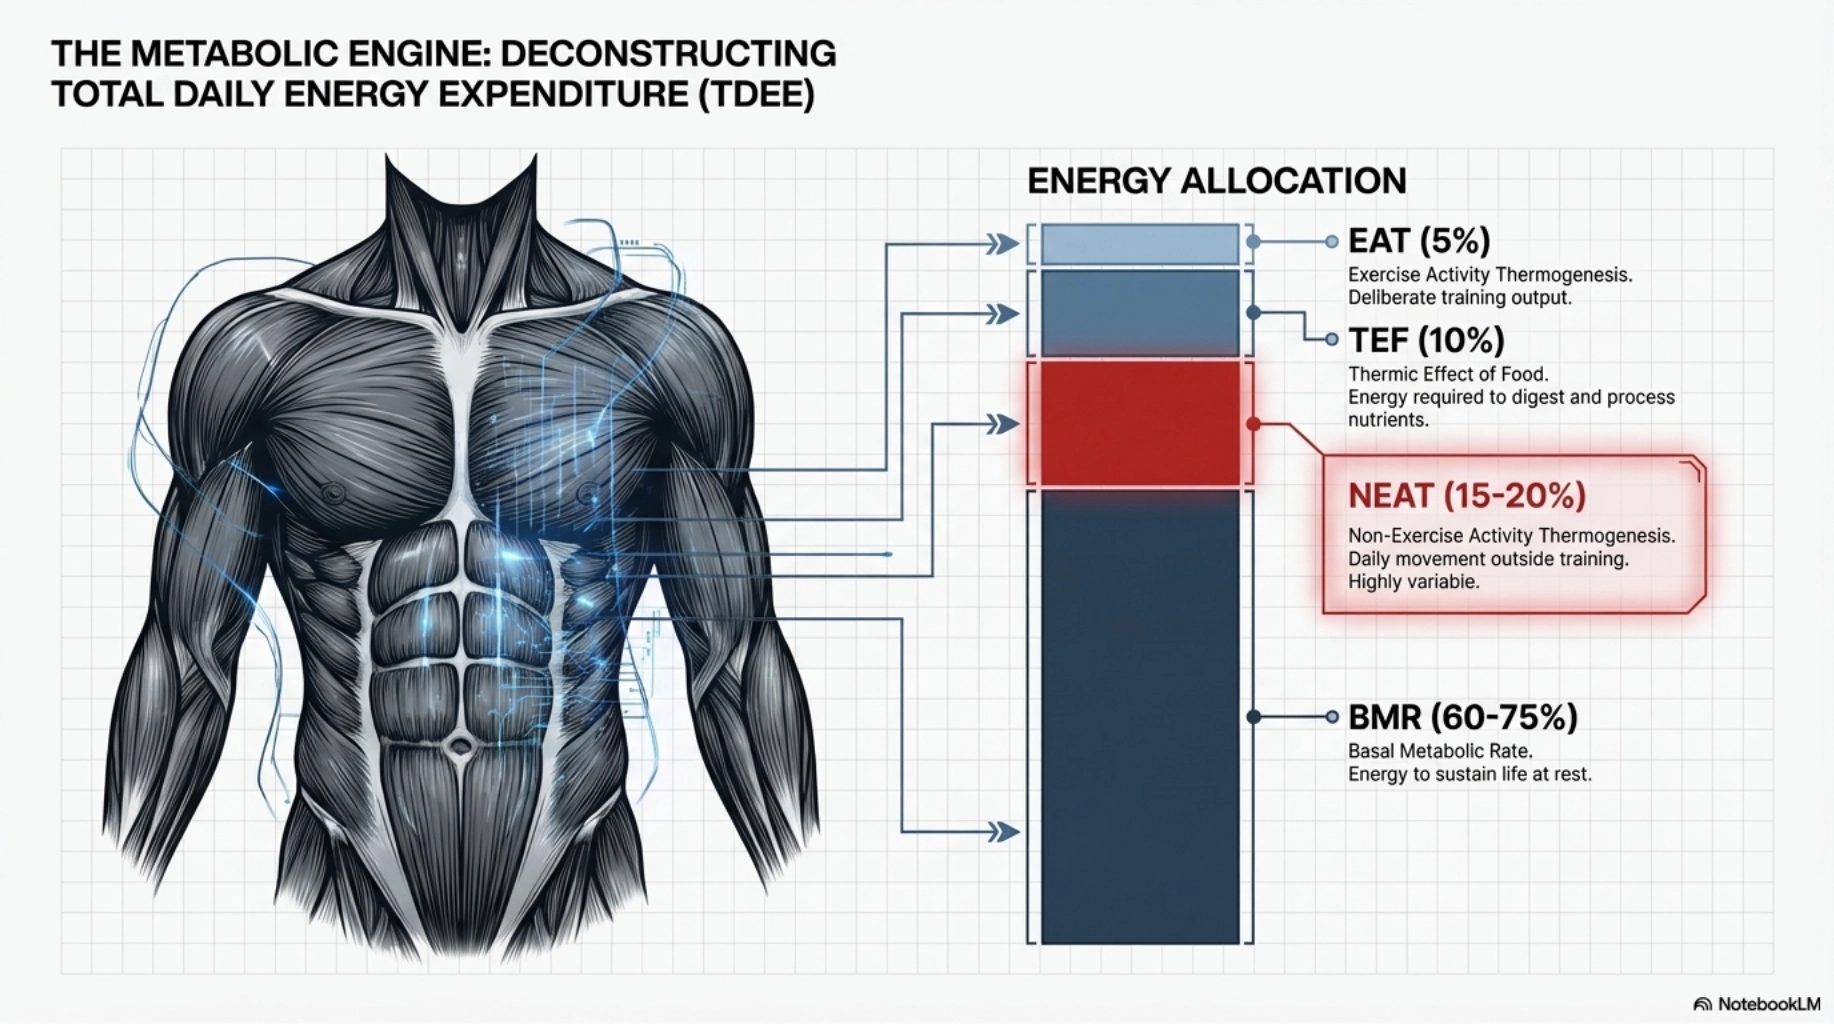
Maintenance is commonly referred to as your Total Daily Energy Expenditure, or TDEE. It is not a single number generated in isolation, but the combined result of several components working together.
The first component is your Basal Metabolic Rate (BMR). This is the energy your body requires at rest to maintain basic physiological functions such as breathing, circulation, and cellular activity. For most people, this accounts for the largest portion of total energy expenditure, typically in the range of 60 to 70 percent.
The second component is Non-Exercise Activity Thermogenesis (NEAT). This includes all movement outside of structured training, such as walking, standing, and general daily activity. NEAT can vary significantly and often accounts for approximately 15 to 30 percent of total energy expenditure, depending on the individual and their routine.
The third component is Exercise Activity Thermogenesis (EAT), which refers to the energy used during deliberate training. While this is often the most visible part of the process, it usually contributes a smaller proportion of total expenditure than expected, often in the range of 5 to 15 percent.
The final component is the Thermic Effect of Food (TEF). This is the energy required to digest, absorb, and process the food you eat. TEF generally accounts for approximately 10 percent of total energy intake, but this figure is dynamic. It is influenced by macronutrient composition - specifically the higher thermic effect of protein compared to fats and carbohydrates - and the degree of food processing, with whole, fibre-rich foods requiring more energy to process than refined options.
Together, these components form your maintenance level. They are not fixed, and they do not operate independently. Changes in bodyweight, activity levels, training volume, and lifestyle factors all influence how these components behave over time. This is why maintenance should not be viewed as a static number, but as a structured estimate that reflects your current state.
At this stage, the calculation provides direction, not certainty.
This baseline is your starting position. It gives you a reference point that allows you to deliberately maintain, reduce, or increase bodyweight with control. It is also important to reinforce a key principle. Energy balance is non-negotiable. Regardless of the structure of your diet, the foods you choose, or the timing of your meals, bodyweight change is ultimately governed by the relationship between energy intake and energy expenditure. Understanding this removes confusion and allows you to operate the system with clarity.
Step 4: Setting Calorie Targets
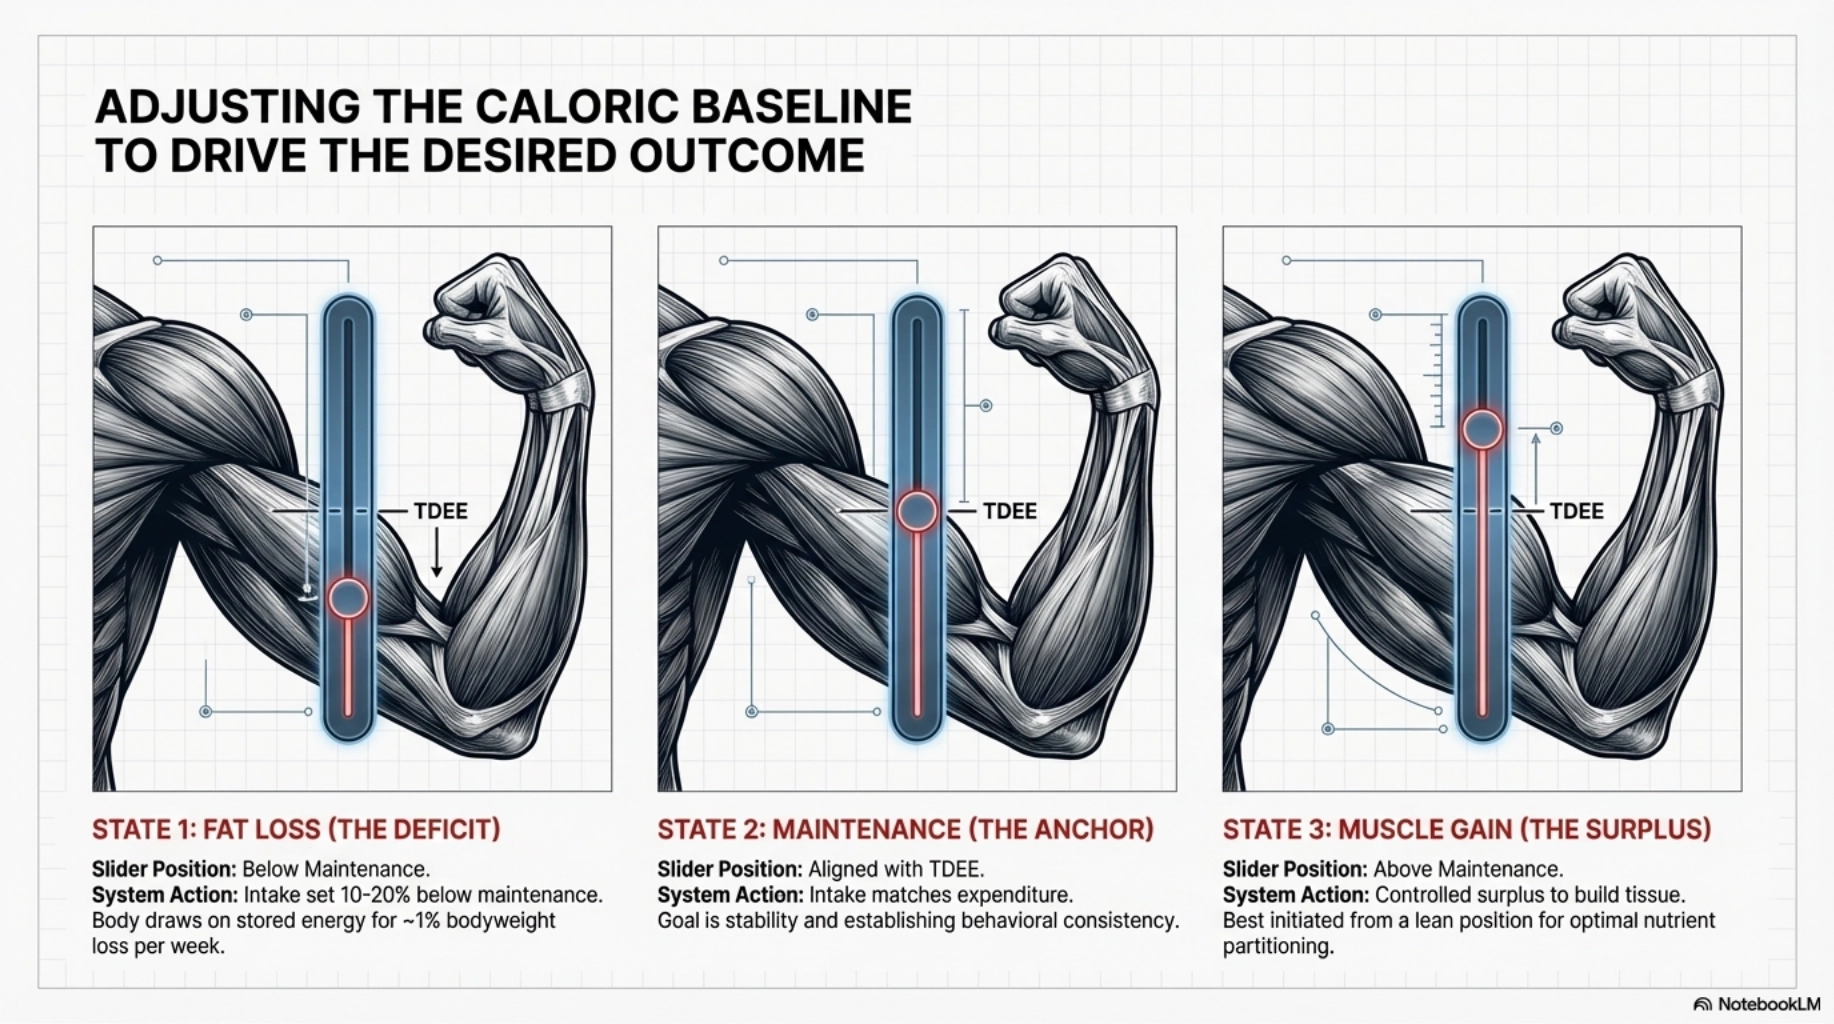
Once your baseline has been established, the next step is to decide what you want your body to do and set your calorie intake accordingly. Your maintenance level gives you a reference point. Your calorie target determines the direction of change.
At maintenance, energy intake is aligned with energy expenditure, and bodyweight remains relatively stable over time. Establishing and validating this level is a fundamental part of the process, as it provides the baseline from which all future adjustments are made. In practice, this requires a period of consistent execution, typically over two to four weeks, to confirm that intake and output are balanced and that bodyweight is stable.
If your goal is to reduce body fat, you will need to create a calorie deficit. A moderate reduction, typically in the range of 10 to 20 percent below maintenance, generally equates to approximately 300 to 500 calories per day for most individuals. This provides a balance between progress and sustainability. While more aggressive deficits may produce faster short-term changes, they often come at the cost of reduced performance, increased fatigue, and lower adherence.
If your goal is to build muscle, calorie intake is set above maintenance in a controlled surplus. A typical starting point is a surplus of approximately 5 to 10 percent above maintenance, or around 200 to 300 calories per day for most individuals. This allows muscle tissue to be built while minimising unnecessary fat gain, particularly when paired with structured resistance training. Progress is measured through improved training performance, recovery, and a gradual upward trend in bodyweight, typically in the range of 0.25 to 0.5 percent of bodyweight per week.
It is important to understand that expected rates of change are not exact. In a fat loss phase, a reduction of around 0.50 to 1 percent of bodyweight per week is often used as a practical guideline. In a muscle-building phase, the rate of gain is typically slower and less visually obvious in the short term. These are not guarantees, but reference points used to assess whether the plan is broadly aligned with the intended outcome.
Faster rates of change often come with a cost. Larger deficits may accelerate weight loss but increase fatigue, reduce training output, and make adherence more difficult. Larger surpluses may improve short-term performance but lead to unnecessary fat gain. Slower, more controlled approaches tend to be easier to sustain and produce more predictable outcomes over time.
There is also a distinction between mathematical precision and psychological adherence. A calorie target can be calculated accurately, but if it cannot be followed consistently, it loses its value. A slightly less precise target that can be adhered to daily will produce better outcomes than a perfectly calculated plan that is followed inconsistently.
At this stage, the objective is alignment rather than perfection.
Pro Tip
Rate of Fat Loss and Adherence: A sustainable and effective rate of fat loss typically sits between 0.5 to 1 percent of bodyweight per week. Pushing beyond this range through more aggressive calorie deficits may produce faster short-term results, but it comes with trade-offs that are often overlooked. Prolonged large deficits can negatively impact recovery, training performance, hormonal function, and overall energy levels. Over time, this increases fatigue, reduces motivation, and makes the plan significantly harder to follow.
Adherence becomes the limiting factor. The more aggressive the deficit, the more pressure is placed on both physiology and behaviour. Hunger increases, energy decreases, and consistency becomes harder to maintain. This often leads to cycles of strict restriction followed by lapses, which disrupt progress and make results less predictable.
A more controlled approach allows for better adherence, more stable performance, and a higher likelihood of sustaining the process over time. Strategies such as maintaining higher food volume through fibre-rich foods, structuring meals consistently, and incorporating planned flexibility can help manage hunger and reduce friction.
Step 5: Building the Macronutrient Framework
Once your calorie target has been set, the next step is to determine how those calories are made up. Calories define direction, but macronutrients define structure. This is where the plan moves from a total number into a framework that supports both physiology and execution.
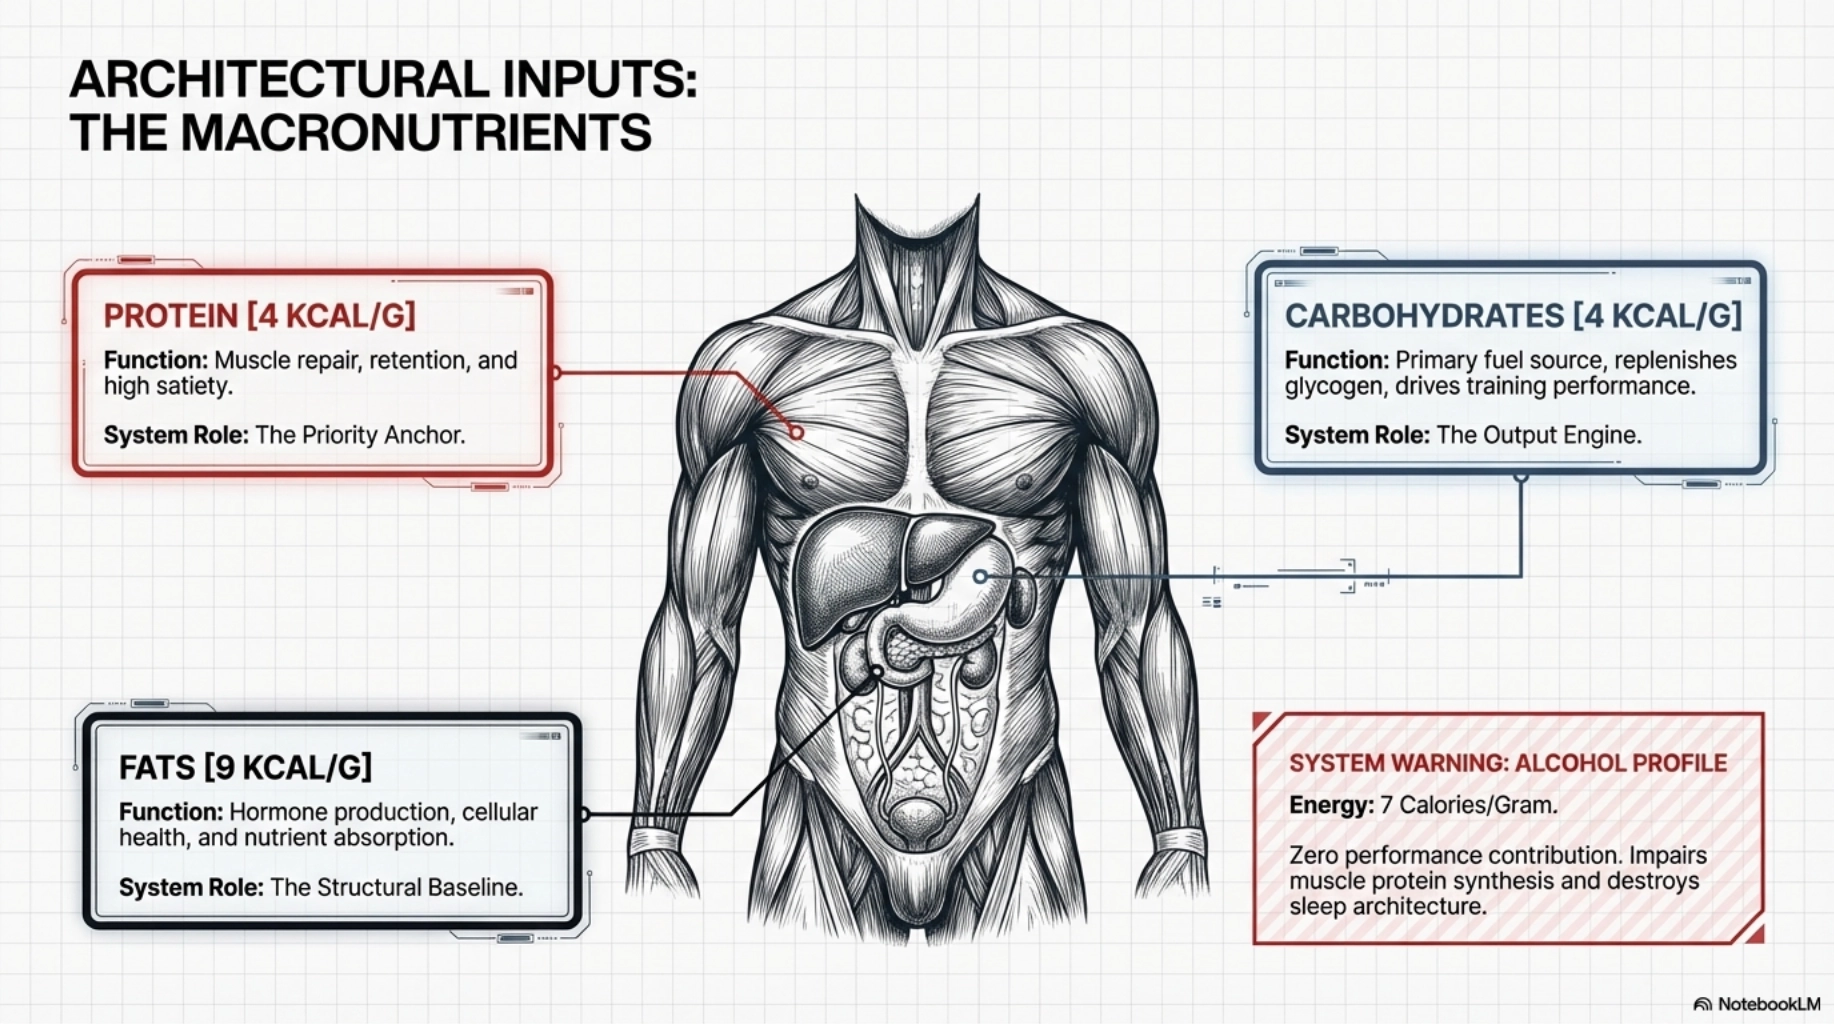
There are three primary macronutrients: protein, carbohydrates, and fats. Each provides energy, but each also serves a distinct role within the body. Protein supports muscle repair, recovery, and retention, and contributes significantly to satiety. Carbohydrates act as the primary fuel source for training and daily activity, supporting performance and replenishing glycogen stores. Fats support hormone production, cellular health, and nutrient absorption, and provide a more concentrated source of energy.
Each macronutrient contributes calories in a predictable way. Protein provides four calories per gram. Carbohydrates provide four calories per gram. Fats provide nine calories per gram.
The allocation of these macronutrients follows a defined sequence. Protein is set first. This is consistent across all phases because it directly supports lean tissue, recovery, and satiety. In a fat loss phase, protein is generally kept higher, often around 2.2 grams per kilogram of bodyweight, to support muscle retention and satiety. At maintenance, intake will often sit around 2 grams per kilogram. In a surplus, while protein requirements for muscle repair are easily met, intake should still be maintained around 2.0 grams per kilogram. This supports continued lean tissue growth while leveraging protein's high satiety and thermic effect to help manage hunger and minimise unnecessary fat gain as total calories increase.
Fats are set next. A common range is between 0.8 to 1 gram per kilogram of bodyweight. In a fat loss phase, fats are typically kept toward the lower end of the range so that more calories can be allocated to carbohydrates without compromising essential function. Fats also play an important role in nutrient absorption, particularly for fat-soluble vitamins such as vitamins A, D, E, and K, which is another reason they should not be reduced without purpose.
Carbohydrates then fill the remaining calories. This is where flexibility exists, and where intake can be scaled based on performance demands. Higher training volume and intensity generally require higher carbohydrate intake to support energy output and recovery. As a broad reference point, carbohydrate intake may fall anywhere from around 2 to 6 grams per kilogram of bodyweight, but this can vary significantly depending on total calorie intake, activity level, and phase.
Fibre also plays an important role within this structure. While it does not contribute energy in the same way as the primary macronutrients, it has a significant impact on digestion, satiety, and overall health. In practical terms, higher fibre intake often makes a calorie target easier to adhere to, particularly in a deficit where hunger management becomes more important.
Protein establishes the foundation, fats support essential function, and carbohydrates provide the remaining energy required for performance and daily activity.
Pro Tip
Impacts of Alcohol: Alcohol provides 7 calories per gram, making it a relatively dense source of energy, but it is not classified as a macronutrient and does not contribute meaningfully to performance, recovery, or muscle development. When consumed regularly, alcohol can negatively impact multiple aspects of the system. It can impair recovery by reducing muscle protein synthesis, disrupt sleep quality, and decrease training performance.
Alcohol also affects appetite regulation and decision-making. It can increase hunger, reduce inhibition, and lead to higher overall calorie intake, often without accurate tracking. From a structural standpoint, alcohol must be accounted for within total calorie intake. If it is not tracked, it can easily push intake above the intended target.
The key point is not elimination, but awareness and control. Left unmanaged, alcohol can undermine the accuracy of the system. When accounted for properly, its impact can be minimised without disrupting overall progress.
Step 6: Turning Macros into Repeatable Meals
Once your macronutrient targets are set, the next step is to translate those numbers into something you can consistently follow. Macronutrients provide structure, but they are not actionable on their own. They need to be expressed through meals, food choices, and a routine that can be repeated without constant adjustment. This is where the process moves from calculation into execution.
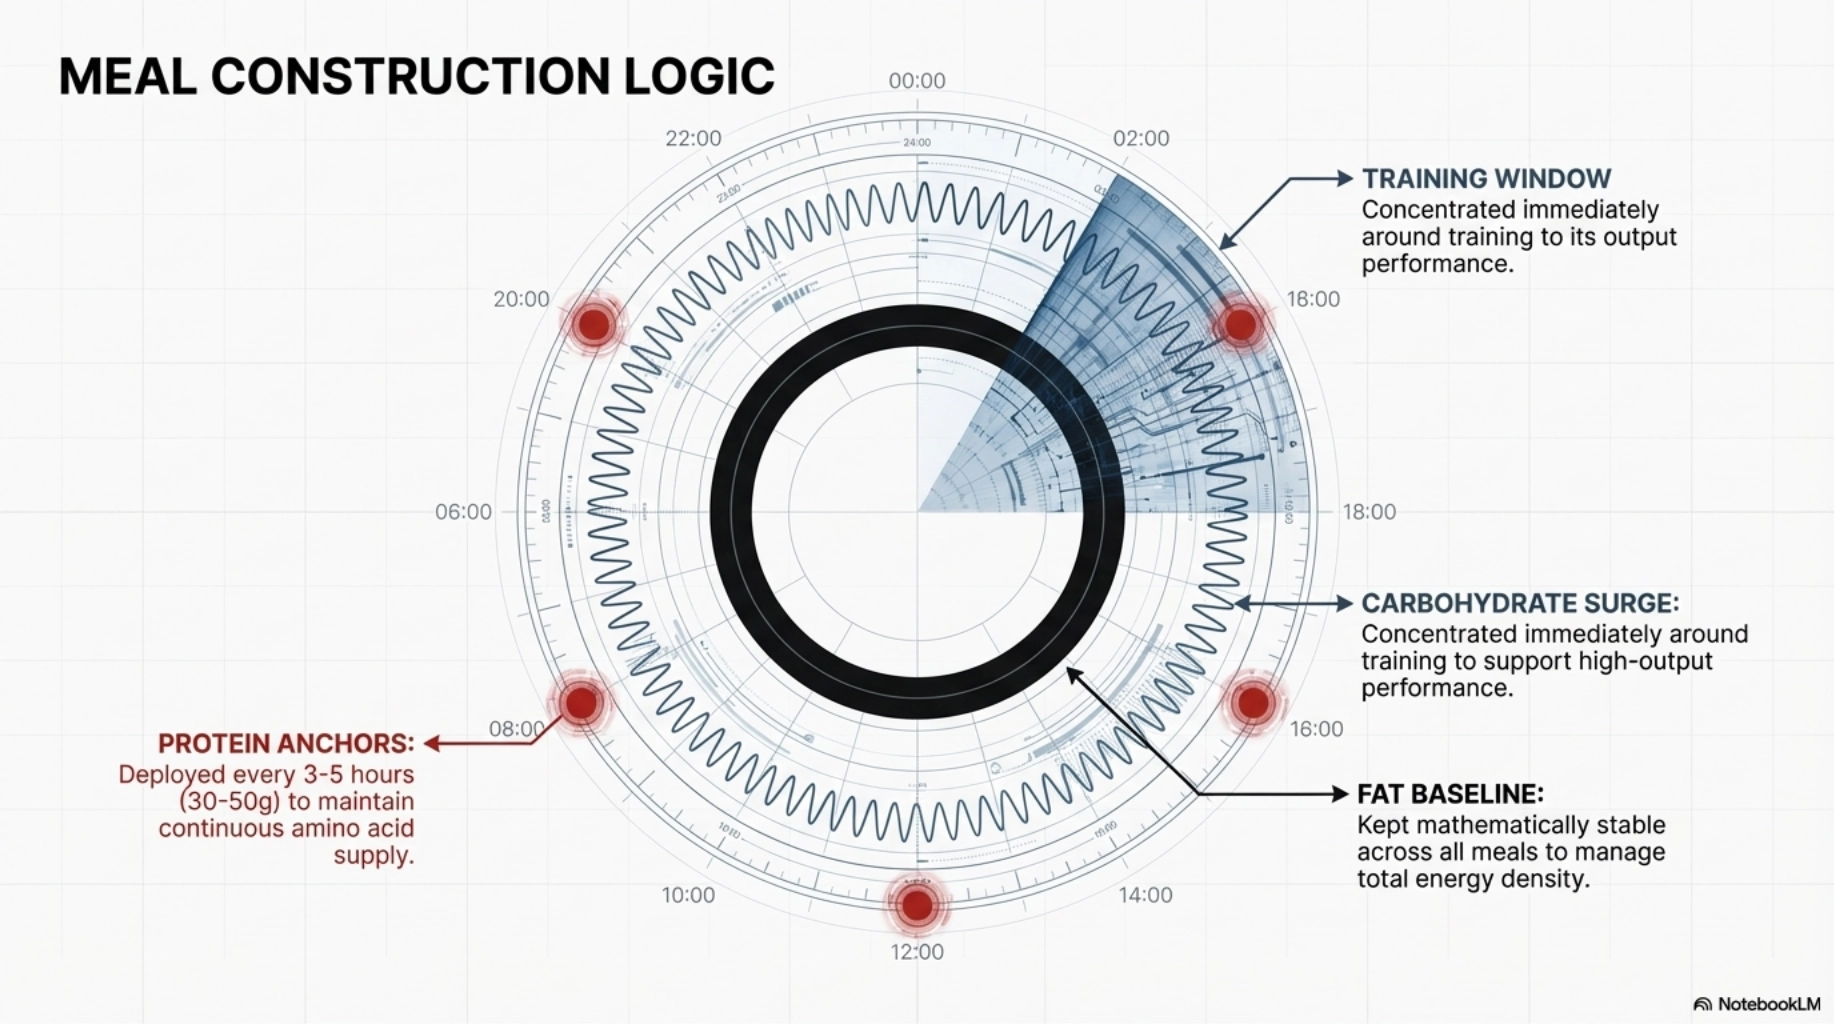
The most effective way to do this is to anchor each meal around protein. Protein is the priority because it supports muscle retention, recovery, and satiety. A practical approach is to distribute protein evenly across the day, typically every three to five hours, so that intake is consistent and predictable. This also supports muscle protein synthesis and helps manage hunger. In most cases, this will equate to roughly 30 to 50 grams of protein per meal, depending on your total daily intake.
Once protein is set within each meal, fats are then added in a way that supports overall intake and satiety. Because fats are more energy-dense, even small changes can significantly impact total calorie intake. For this reason, they are usually kept relatively consistent across meals rather than fluctuating heavily. This creates stability within the structure and reduces the likelihood of unintentionally exceeding your calorie target.
Carbohydrates are then layered around protein and fats based on your remaining targets and performance demands. They are typically placed where they are most useful, with the most obvious example being around training. Higher carbohydrate intake before and after training can support energy output, performance, and recovery. Outside of training, carbohydrates can be distributed more evenly across meals to maintain stable energy levels throughout the day.
This creates a simple and repeatable framework. Protein anchors each meal, fats provide stability, and carbohydrates are adjusted based on activity and remaining intake. Each meal contributes to the total, and when combined, they align with the structure you have already set.
Meals do not need to be perfectly identical, but they should be relatively balanced in terms of total calories so that the overall day aligns with your targets. What matters most is that when all meals are combined, they add up to the structure you have already defined.
At this stage, consistency becomes more important than variety.
One of the most common reasons people struggle with adherence is decision fatigue. The more choices you are required to make throughout the day, the more likely you are to deviate from the plan. Repeating meals across the week reduces this cognitive load. It removes the need to constantly calculate, adjust, or question what you are eating, and allows you to focus on execution rather than decision-making.
This is where meal standardisation becomes valuable. Having a small number of structured meals that you rotate consistently creates predictability. It simplifies shopping, preparation, and tracking, and makes it easier to identify when something is off. Variety is not inherently beneficial if it comes at the cost of consistency. In most cases, repetition produces better adherence and more reliable outcomes over time.
Once the structure of meals is in place, the next layer is food selection.
The goal is not to memorise every possible food, but to understand how different foods align with each macronutrient group so that meals can be built with clarity and repeated without unnecessary complexity.
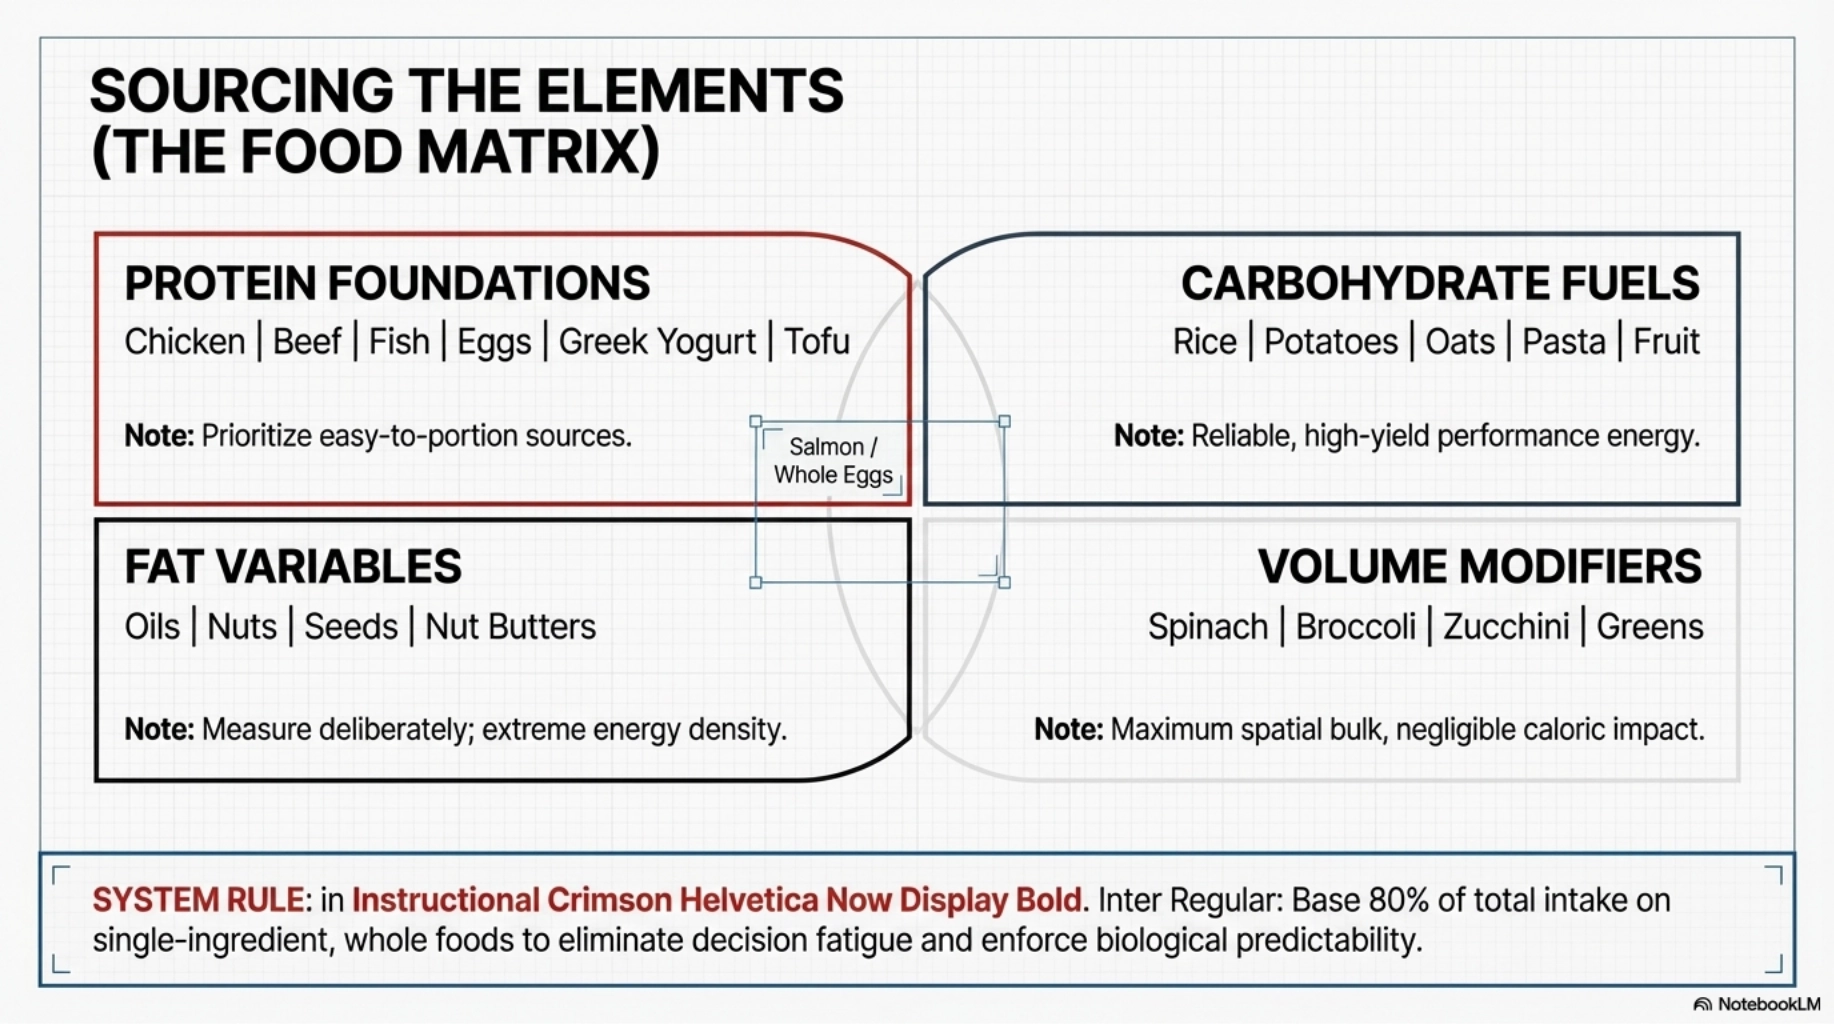
Protein-based foods should form the foundation of your meals. These include sources such as chicken, beef, fish, eggs, dairy products such as Greek yogurt and cottage cheese, protein powders, and plant-based options like tofu and legumes. While many of these foods contain small amounts of fats or carbohydrates, their primary contribution is protein. Choosing protein sources that are easy to prepare, portion, and repeat makes it significantly easier to meet your daily targets without needing constant adjustment.
Carbohydrate-based foods are primarily used to support energy and performance. These include sources such as rice, potatoes, oats, pasta, bread, cereal, and fruit. These foods provide a consistent and reliable source of fuel for both training and daily activity, and are typically distributed across meals to maintain stable energy levels throughout the day. The focus should be on selecting carbohydrate sources that are easy to prepare, portion, and repeat, so that your energy intake remains consistent and aligned with your targets.
Fats are typically added in smaller amounts but play an important role in rounding out your meals. Common sources include oils, nuts, seeds, nut butters, and foods such as cheese. Because fats are more energy-dense, they should be measured more deliberately and kept relatively consistent across meals. The goal is to include fats in a controlled way so that they support your overall structure without unintentionally pushing calories beyond your target.
Vegetables sit slightly outside of the primary macro structure. Non-starchy vegetables such as spinach, broccoli, zucchini, cucumber, lettuce, capsicum, and green beans contribute very few calories relative to their volume. Their role is to add bulk to meals, improve satiety, and support overall dietary quality without significantly impacting your calorie targets. Because their energy contribution is low, they can be included more freely alongside your main food sources without needing the same level of precision in tracking, unless intake becomes substantial.
Food selection directly influences how sustainable the plan is. Whole, minimally processed foods should form the majority of your intake. These foods are generally more filling, easier to manage, and more consistent in portioning. This does not mean that all processed foods need to be removed. A degree of flexibility can be included, as long as the overall structure remains intact. Poor food choices can distort tracking accuracy. Highly processed foods are often more calorie-dense, less satiating, and more difficult to portion accurately. Small errors in tracking can accumulate over time, creating a gap between planned intake and actual intake. This reduces the reliability of your data and makes it harder to assess whether the plan is working as intended.
Flexibility is important for adherence but must operate within a consistent structure, not replace it. Your intake should be mostly predictable and repeatable to ensure stable execution. Deliberate flexibility, such as the 80/20 rule or calorie banking, allows for variation without abandoning the framework. When the majority of your food choices are structured, a small amount of variation won't disrupt the system. The goal is for the overall day and week to still align with your targets, maintaining a practical system without becoming rigid. These strategies will be explored in more detail in the next chapter. Flexibility must be built into the structure, not used to replace it entirely.
This step is where the plan becomes operational. Calories and macronutrients define what should happen. Meals and food choices determine whether it actually does. In the next step, this structure is tested in the real world, where consistency and observation determine whether the plan is producing the intended outcome.

Step 7: Real-World Validation
At this stage, the plan has been built. Calories are set, macronutrients are structured, and meals have been established in a way that can be repeated. The next step is to test whether that plan produces the intended outcome when applied in a real-world environment. This is where the process moves from theory into evidence.
The initial calculation is an estimate. It becomes meaningful only when it is executed consistently and observed over time. This requires a period of stable execution, typically two to four weeks, where calorie intake, meal structure, and activity levels are kept as consistent as possible. The objective during this phase is not to force rapid change, but to allow a clear signal to emerge from the data.
Adherence is the primary variable.
If the plan is not being followed consistently, the data becomes unreliable. Consistent meals, repeatable food choices, and stable routines reduce variability and make it easier to interpret outcomes. When food selection changes constantly, portioning becomes inconsistent, and intake becomes harder to track accurately.
Bodyweight should be tracked daily under consistent conditions, ideally first thing in the morning, fasted. However, individual readings should not be interpreted in isolation. Scale weight is influenced by multiple factors beyond body fat, including glycogen storage, sodium intake, hydration levels, digestion, inflammation from training, and stress. Weekly averages provide a clearer picture than daily readings. This is where the concept of data lag becomes important. Changes in calorie intake do not produce immediate, perfectly linear changes in bodyweight. Reacting too early to short-term fluctuations often leads to unnecessary adjustments that disrupt the process.
This is also where flexibility strategies become practical tools for maintaining adherence. The 80/20 approach means that approximately 80 percent of your intake comes from structured, whole food sources, while the remaining 20 percent allows for controlled flexibility. Calorie banking allows you to redistribute your daily or weekly calorie intake to accommodate real-world situations, such as a social event, without exceeding your overall target.
At the end of this period, you will have enough data to assess whether your baseline and calorie targets are aligned with your goal. If bodyweight is stable at maintenance, decreasing at an appropriate rate in a deficit, or increasing in a controlled manner in a surplus, then the plan is functioning as intended. If it is not, this does not indicate failure. It indicates that the estimate needs to be refined.
Pro Tip
Adherence is not simply a matter of discipline. It is the outcome of how well the plan fits into your routine. If meals are difficult to prepare, food choices are inconsistent, or structure changes daily, adherence becomes harder to maintain. When meals are repeatable, food choices are predictable, and the routine is stable, adherence becomes easier to sustain. The system is designed to reduce the need for willpower.
Step 8: Navigating Adaptation and Troubleshooting
As the process continues, your body begins to adapt. What worked at the start of a phase will not produce the same outcome indefinitely. This is not a flaw in the system. It is a normal physiological response to changes in energy intake, activity, and body composition.
During a fat loss phase, as bodyweight decreases, your Basal Metabolic Rate reduces because there is less total mass to maintain. At the same time, Non-Exercise Activity Thermogenesis often declines without you consciously noticing. You may move less, take fewer steps, or become more efficient in your movement patterns. Training performance may also decrease as fatigue accumulates. Together, these changes reduce total energy expenditure over time. This is referred to as metabolic adaptation.
Lean body mass also plays an important role. Muscle tissue is more metabolically active than fat tissue, meaning it requires more energy to maintain. As a result, individuals with higher levels of lean mass generally have higher maintenance energy requirements. During a fat loss phase, preserving lean tissue helps maintain a higher metabolic rate, while in a muscle-building phase, increasing lean mass contributes to a gradual increase in overall energy expenditure over time.
Scale weight should not be used in isolation. It remains one of the most important metrics, but it must be interpreted alongside others. Progress can also be assessed through changes in physique, measurements, strength and training performance, and how clothing fits. Weekly check-in photos often provide a clearer reflection of visual change than the scale alone.
Plateaus are often misunderstood.
A lack of immediate scale movement is frequently assumed to be a failure of the plan, when in reality it may be the result of normal fluctuations, adaptation, or a temporary masking of progress. Reacting too quickly to these changes leads to unnecessary adjustments that disrupt the system.
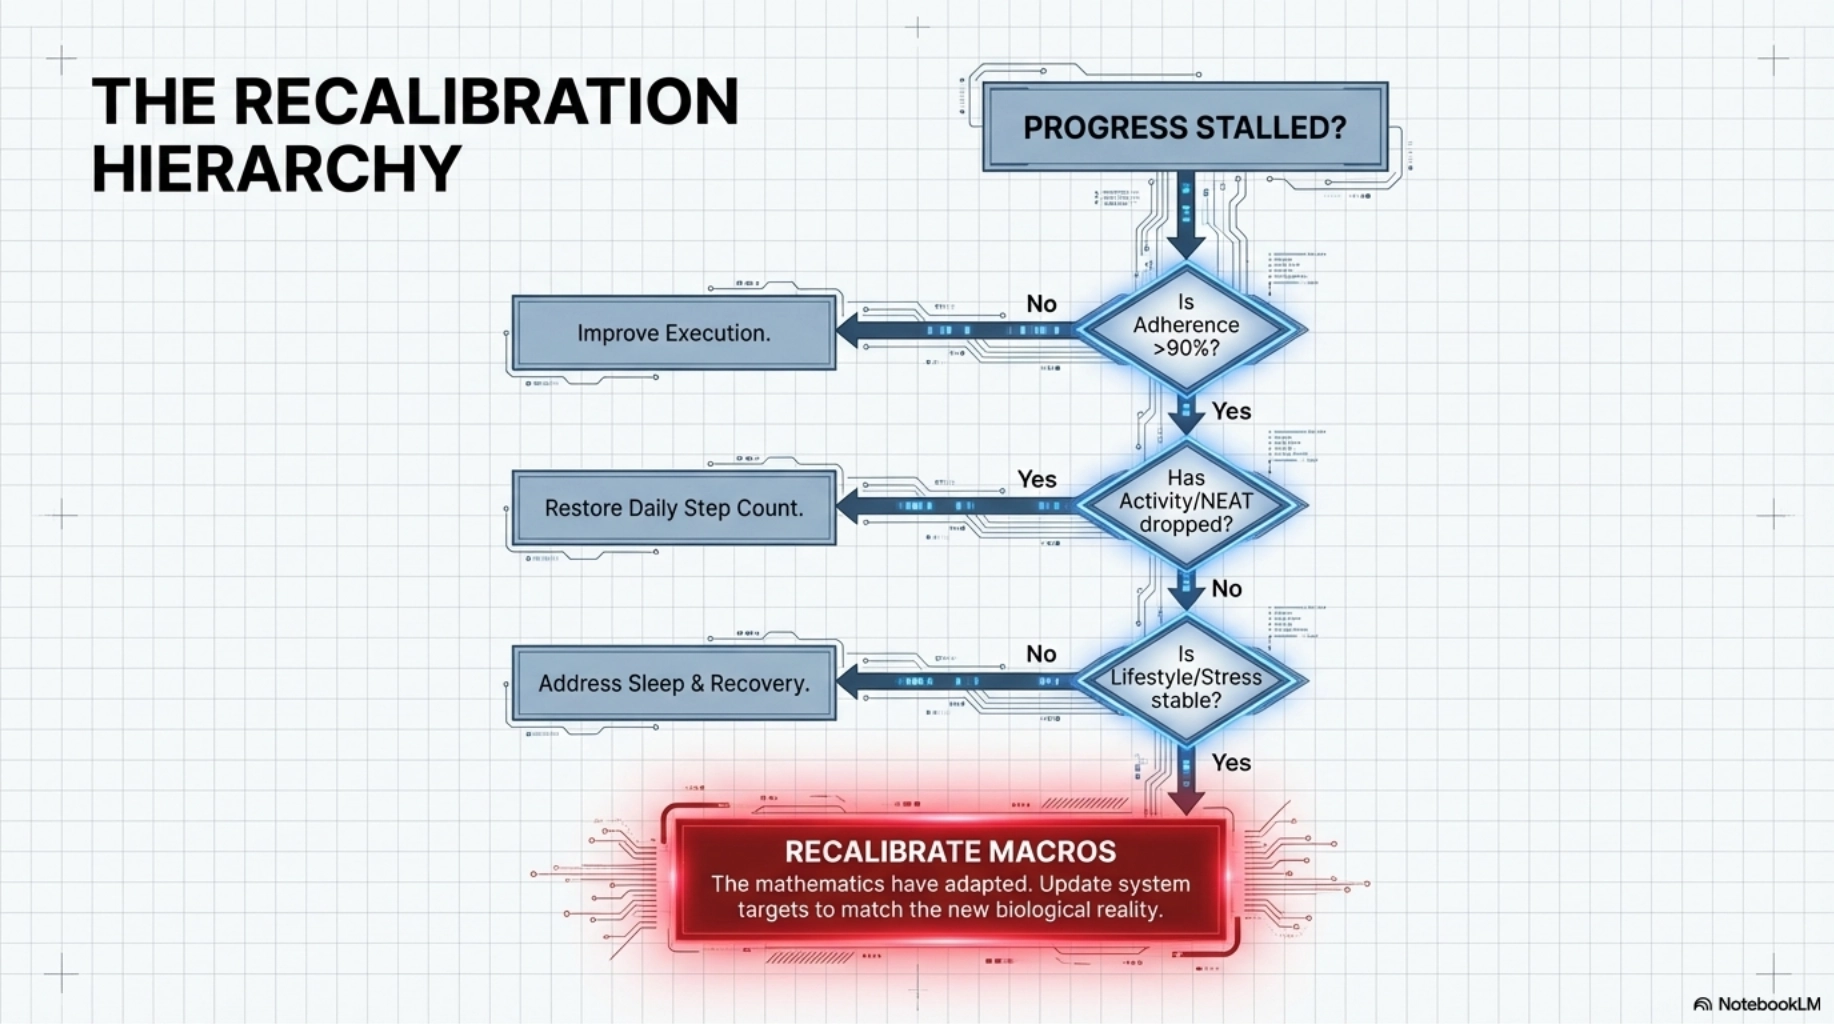
To avoid this, troubleshooting must follow a clear and repeatable hierarchy. First, review adherence. If calorie intake, meal structure, or overall consistency have not been maintained, the issue is execution, not the plan itself. Second, review activity. Changes in daily movement or training output can significantly alter energy expenditure. Third, review lifestyle. Sleep, stress, hydration, and routine all influence both behaviour and data quality. Only once these factors are consistent should calorie targets be adjusted.
Adherence → Activity → Lifestyle → Calories
This structure protects the system from unnecessary change. It ensures that adjustments are made based on evidence rather than reaction.
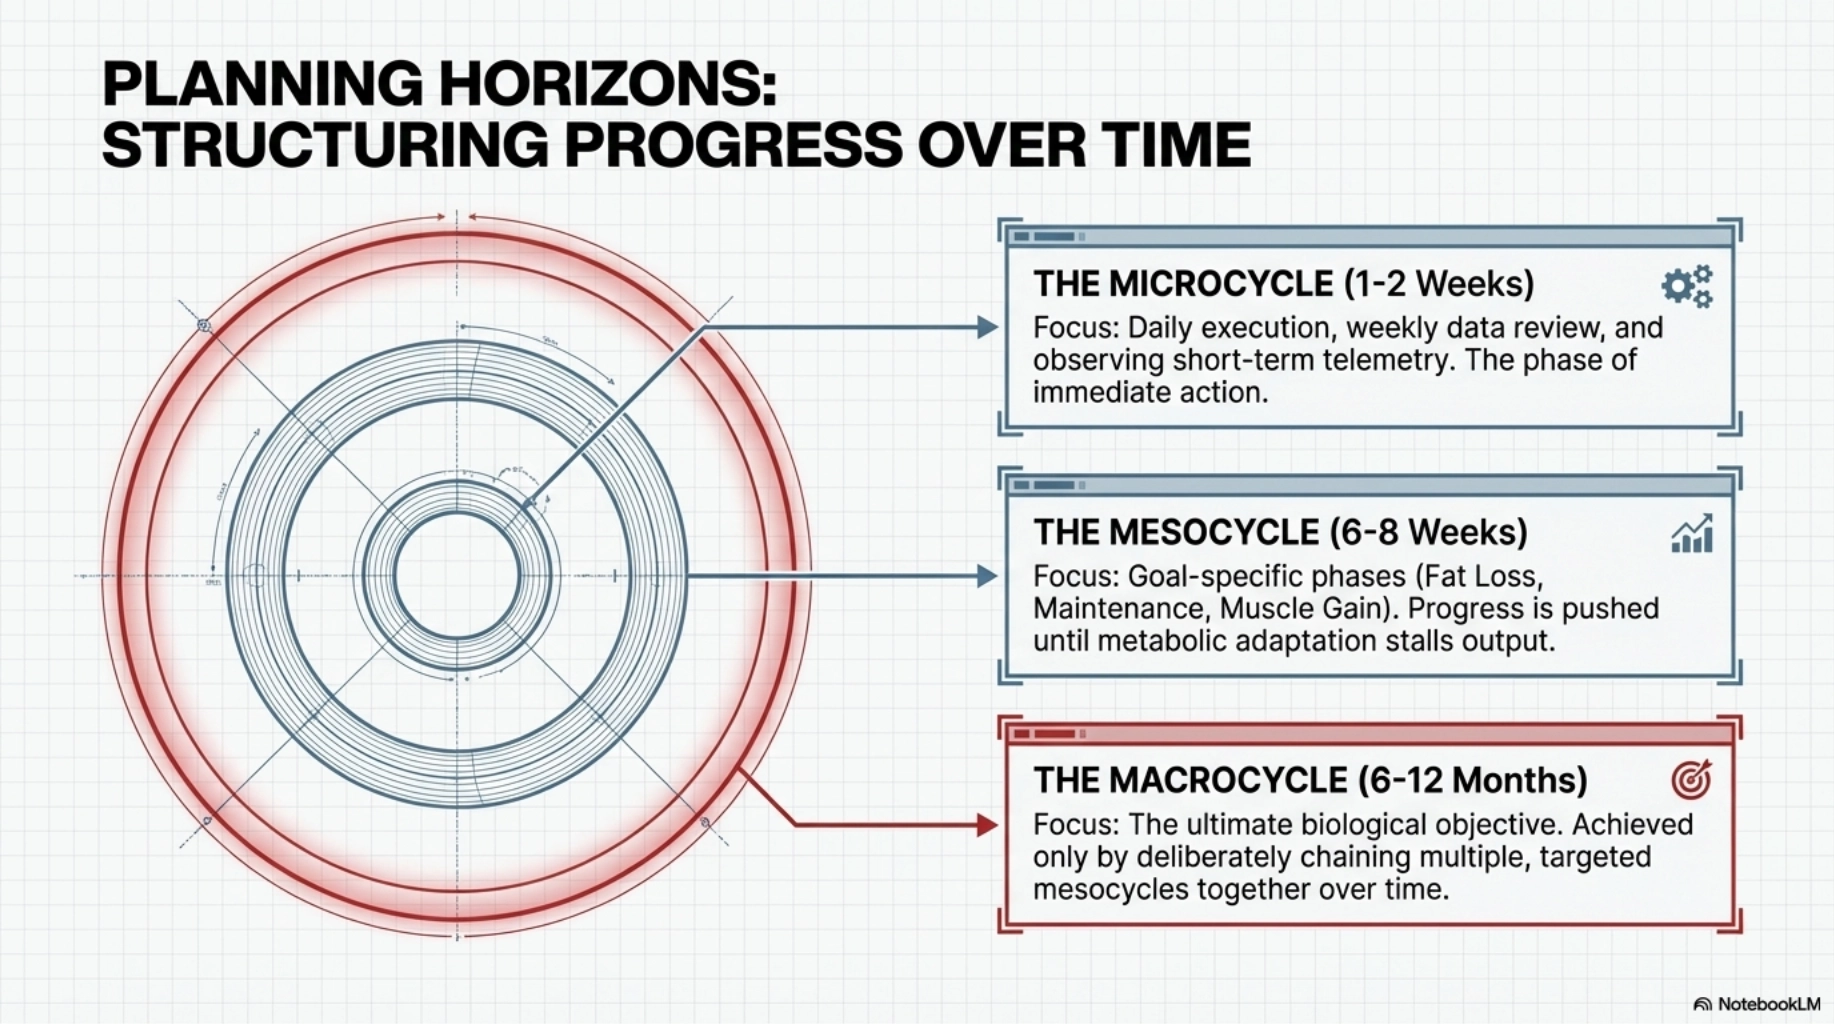
Step 9: Structuring Cycles and Planning Horizons
By this point, you understand how to build and adjust the plan in the short term. The next step is to zoom out and understand how progress is structured over longer timeframes. Results are not driven by single days or even single weeks. They are the outcome of consistent execution across defined phases.
Progress is best managed through cycles. At the shortest level, you are operating within a weekly cycle. This is where execution, tracking, and review take place. Daily data is collected and interpreted across the week to establish trends. These short-term cycles allow you to validate your plan and make small adjustments where necessary.
These weekly cycles sit within longer phases, typically lasting between six to eight weeks. These are often referred to as mesocycles. Each phase has a defined objective, such as fat loss, maintenance, or muscle gain. Over a longer timeframe, these phases combine into a broader progression toward a specific outcome, often referred to as a macrocycle, typically spanning several months.
Remaining in a calorie deficit for prolonged periods often leads to diminishing returns. As metabolic adaptation reduces energy expenditure over time, fatigue accumulates, training performance declines, and adherence becomes harder to maintain. This is why extended, aggressive dieting phases often break down rather than produce continuous results.
Maintenance phases provide a solution to this. They allow energy expenditure to stabilise, support recovery, and reduce accumulated fatigue before moving into the next phase. Maintenance is not a pause in progress. It is part of the process that allows future progress to continue.
This is what separates short-term results from long-term control.
Rather than pushing in a single direction until progress stalls, you move through defined phases that align with both your physiology and your capacity to sustain the process. Each phase builds on the previous one, and each transition is made deliberately rather than reactively.
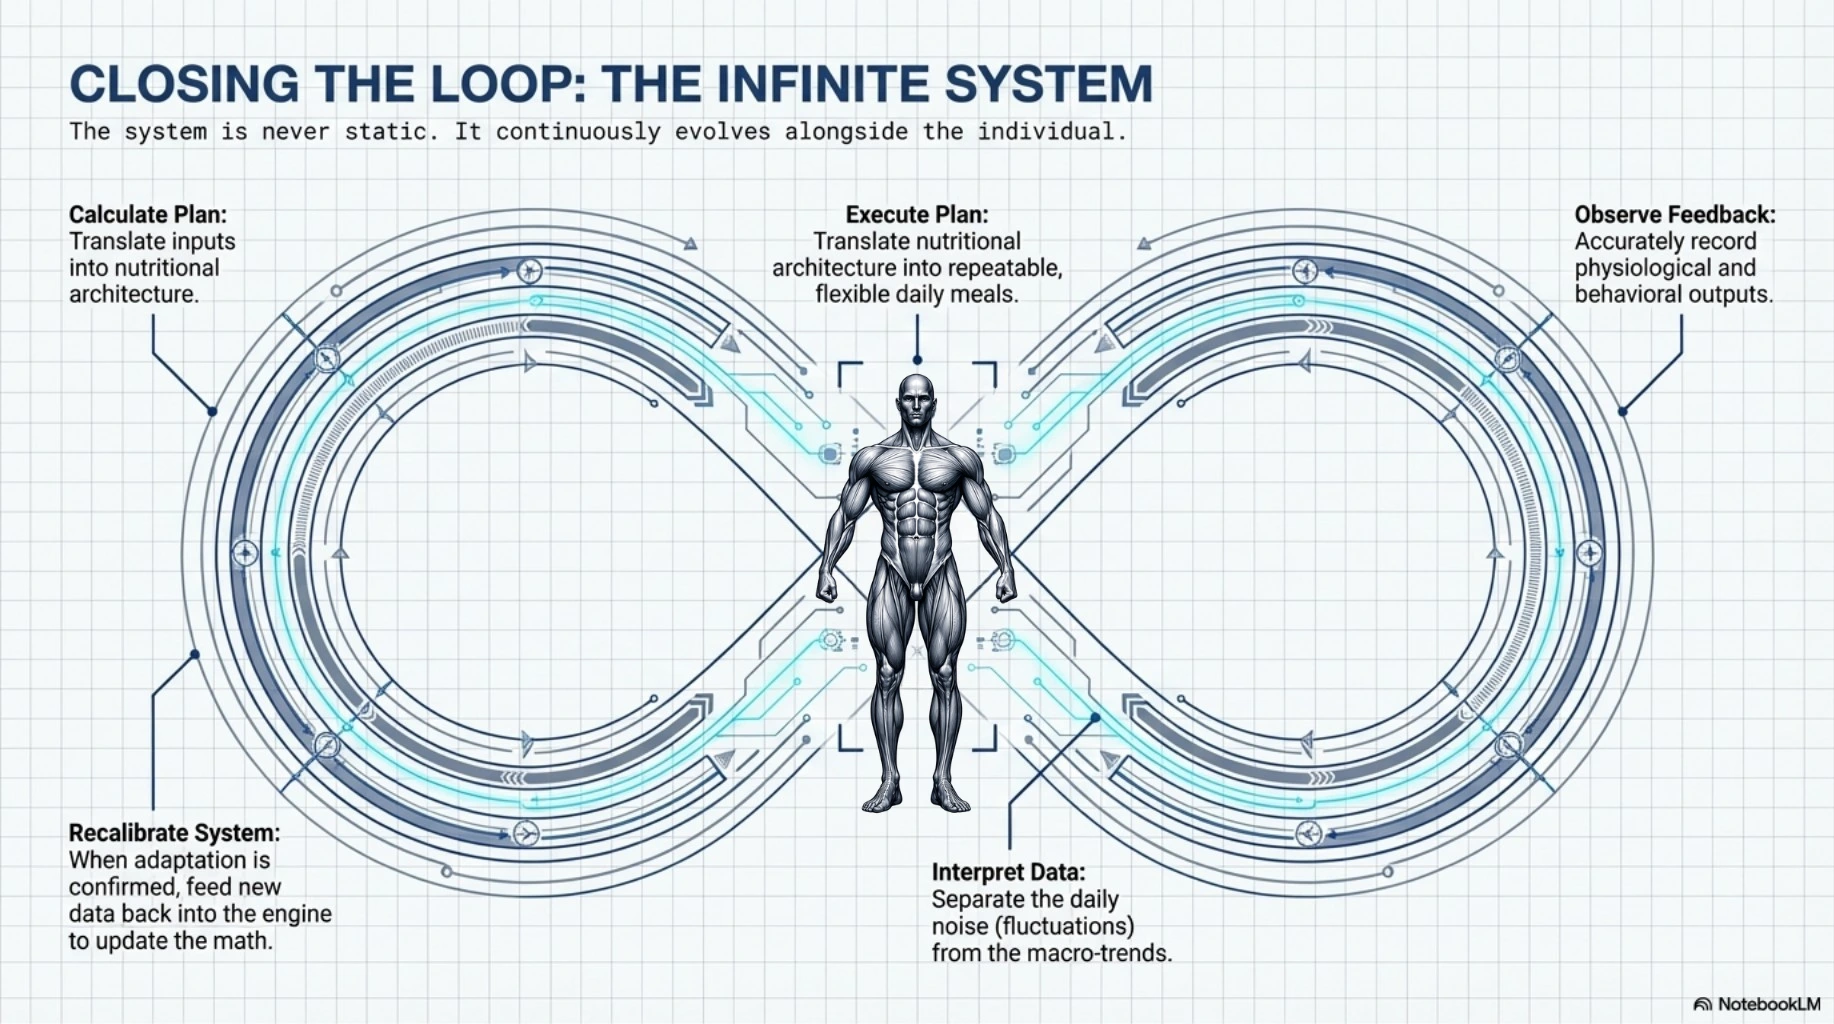
Step 10: Closing the Loop
At this stage, the individual steps come together and the process becomes a system. You have established your baseline, set your targets, structured your macros, translated them into meals, and tested the plan in the real world. What turns this into something sustainable is how these pieces interact over time.
The system operates as a continuous loop.
It begins with calculation. Your inputs define your baseline, your targets, and the structure of your plan. That plan is then executed. Nutrition is translated into repeatable meals and applied through consistent daily behaviour. Execution produces data. Your bodyweight, adherence, and lifestyle variables are observed and recorded. That data is then interpreted. Daily noise is separated from meaningful trends. Patterns begin to emerge. When change is required, the system is recalibrated. Adjustments are made based on evidence, not reaction. Calories are updated, structure is refined, and the loop begins again.
Calculate. Execute. Observe. Interpret. Recalibrate.
Once this loop is understood, it becomes self-sustaining. It no longer relies on a single plan or fixed instructions. It evolves alongside you. Each cycle refines the next, allowing you to maintain control as your body, activity, and environment change.
The challenge is not understanding the process. The challenge is maintaining it. Each time bodyweight changes, activity shifts, or a phase ends, the process must be revisited. Calories are recalculated. Macros are updated. Meals are adjusted. To support this, friction must be minimised. Repeating meals, preparing in advance, and maintaining a consistent routine reduces decision fatigue and improves adherence.
Macro Pro sits at the calculation and planning stage. It establishes your calorie targets, structures your macronutrients, and generates your meal plan based on your inputs and goal. Check-In Pro sits within observation and interpretation. It captures your daily behaviour, tracks your bodyweight and lifestyle variables, and builds a clear picture of how your body is responding over time. Together, they support the full loop.
It is also important to recognise that nutrition is only one part of the overall outcome. Physical training, particularly resistance training and progressive overload, amplifies results. Nutrition sets the foundation. Training determines how that foundation is expressed.
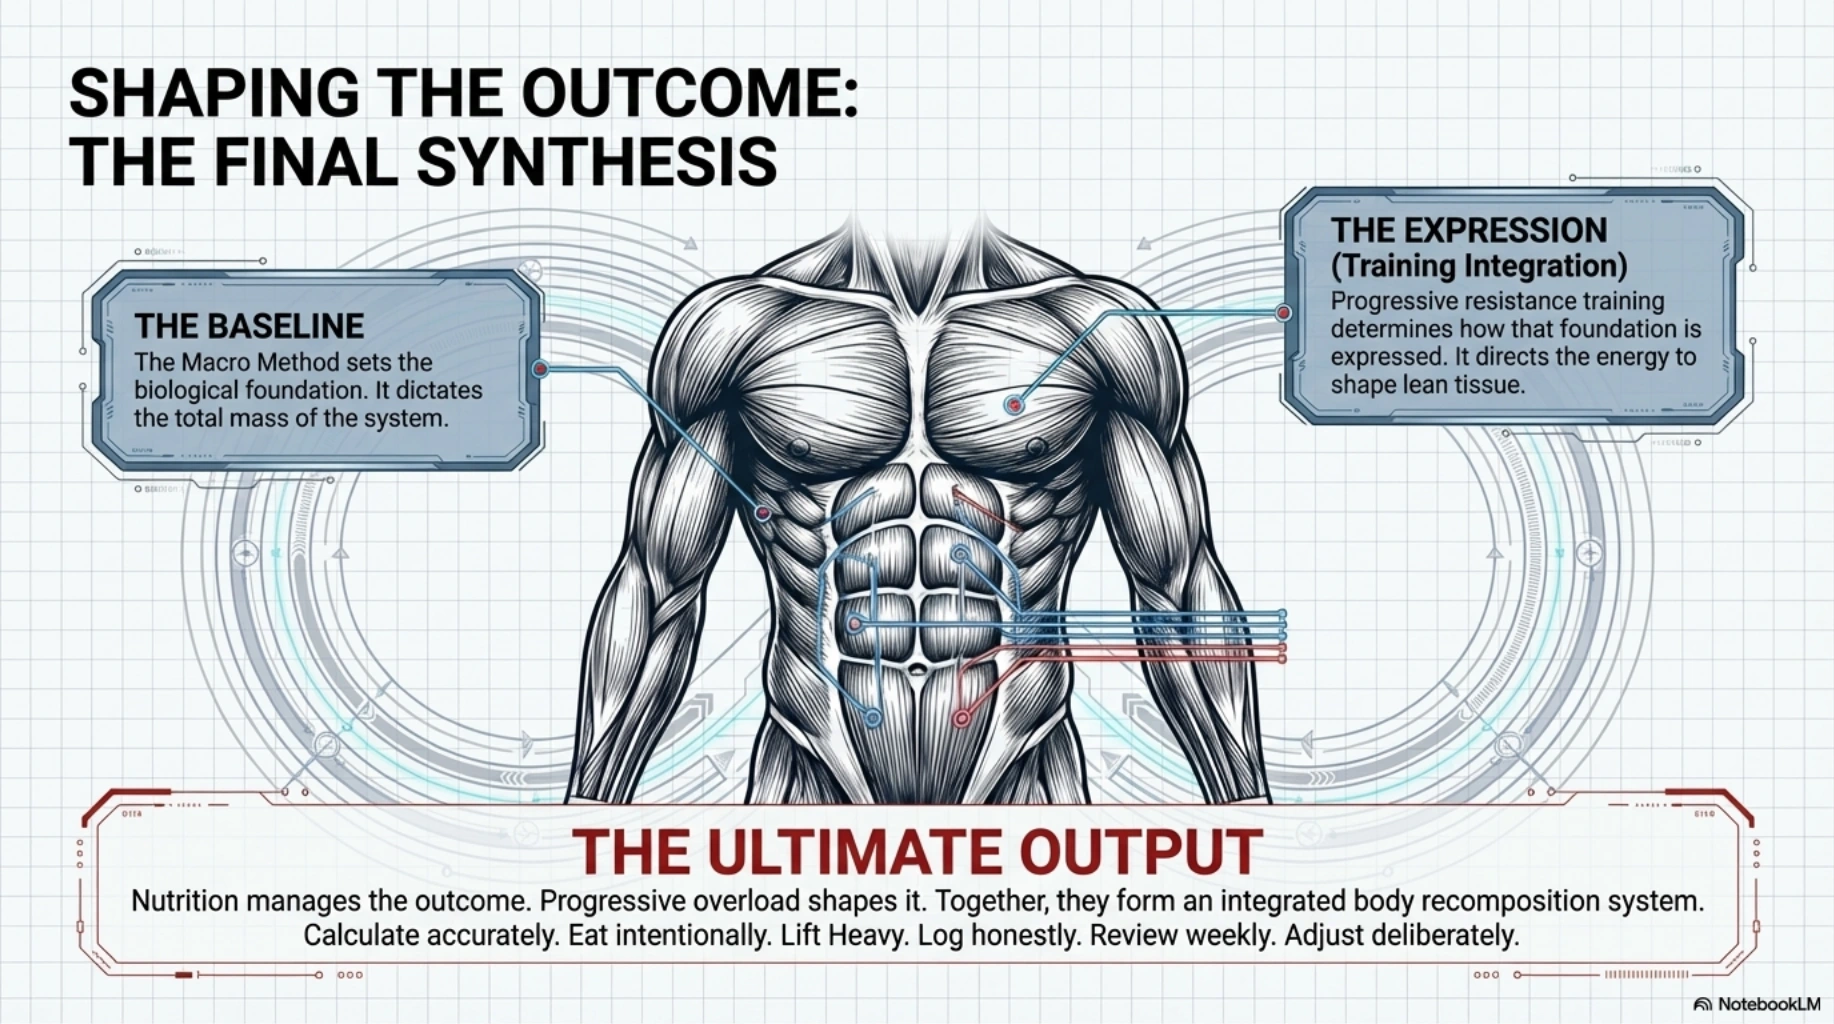
Shaping the Outcome
By this point, you understand how to run the system. You know how to establish your baseline, structure your intake, execute consistently, and adjust based on real-world feedback. The outcome is no longer tied to a single plan, but to a process that can be repeated, adjusted, and sustained over time.
That is the foundation. When applied consistently, it produces predictable change. Bodyweight is managed, structure is maintained, and progress becomes something you control rather than chase. But this is only one part of the overall outcome. Without structured training, the system will still produce change. With it, the result becomes more precise. Energy is directed. Muscle is retained or built. Body composition improves rather than simply shifting weight.
Applying progressive overload, structuring resistance training, and aligning training output with nutritional intake introduces a level of control that sits on top of the system you have already built. It accelerates the rate of change, improves the quality of that change, and allows results to be shaped rather than simply observed.
This is exactly what the training programs inside this system are designed to do. Structuring the Stimulus covers how resistance training works alongside the nutrition system, including how to manage frequency, intensity, volume, and progression. From there, three structured 8-week programs are included depending on how many days per week you can realistically commit to: Full Body for 3 days, Upper Lower for 4 days, and Push Pull Legs for 5 to 6 days. Each program includes coaching cues, target progression, and a built-in training log so you can track every session across the full 8 weeks. The training does not operate separately from the nutrition. It builds directly on top of it.
The foundation is already in place. The training programs give you the structure to build on it. And if you want that process personalised, coaching support is always available to take it further.
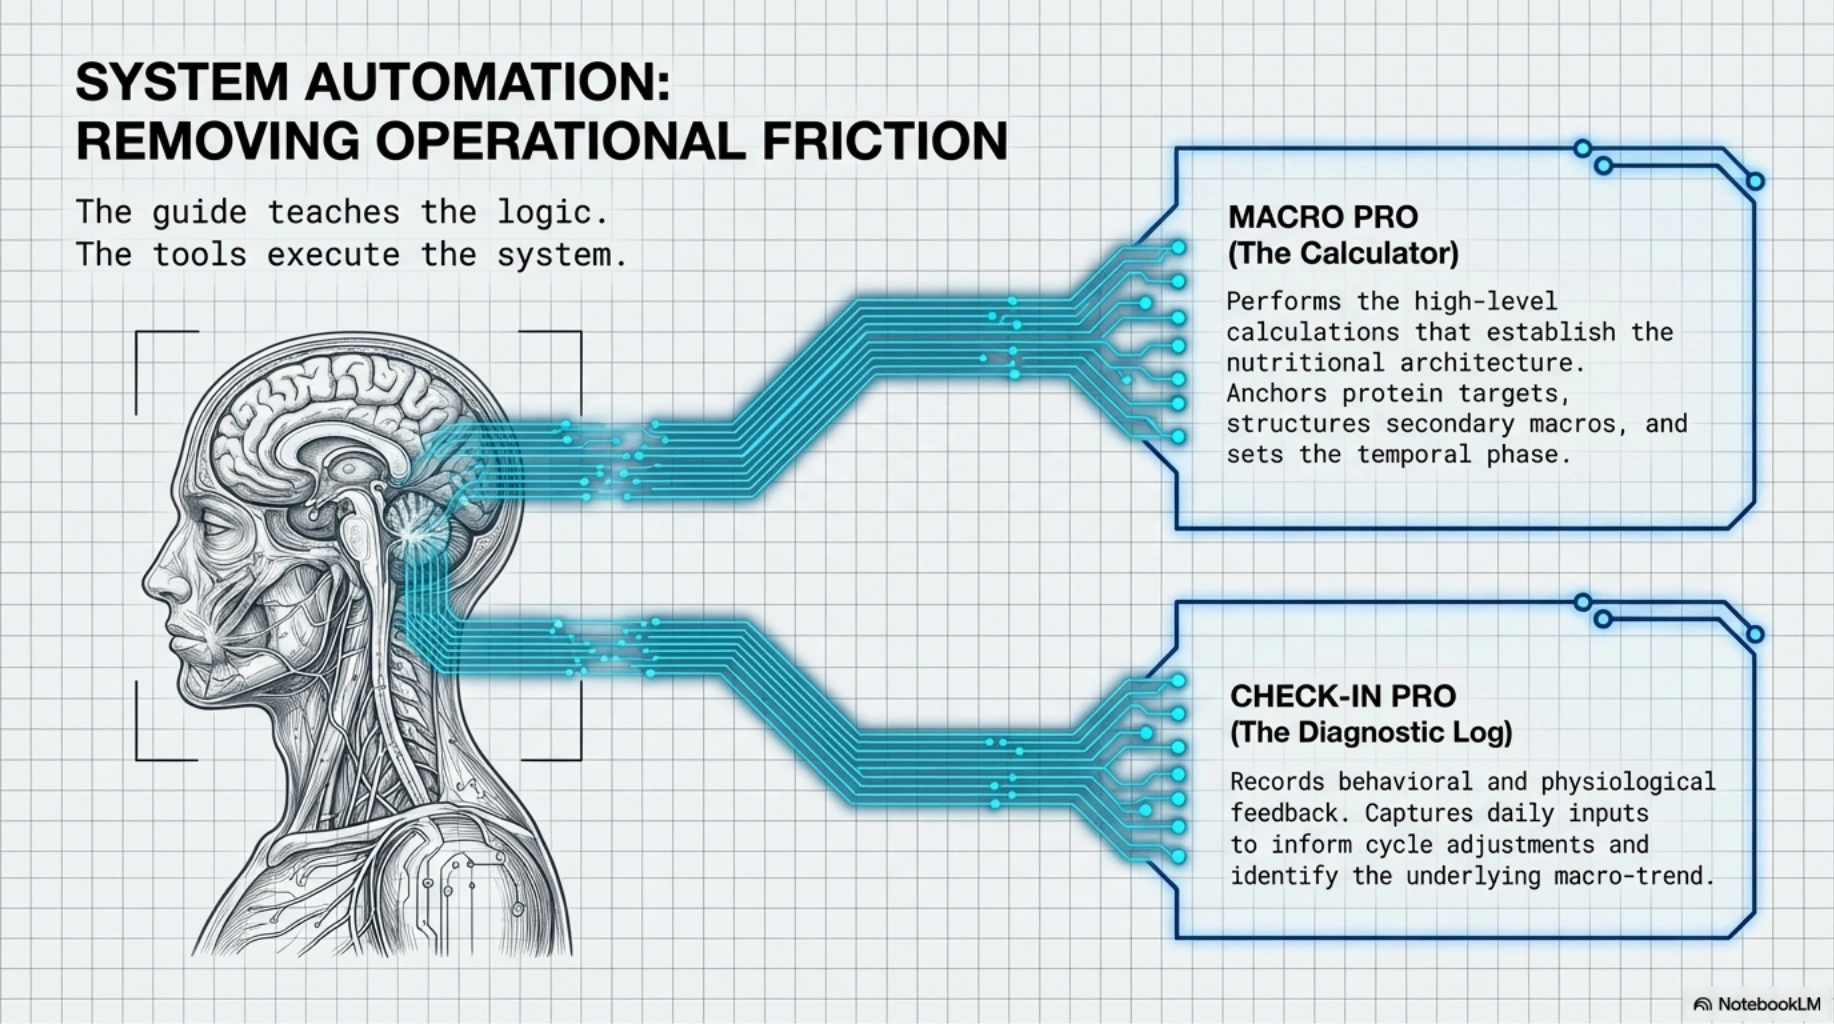
The System is Ready
This guide has covered the full structure of the system. What follows is not more reading, it is the work itself. You now have everything you need to begin. The logic behind the system is clear. The tools that execute it are built and waiting. The only remaining step is to use them.
MACRO PRO
Start with Macro Pro. Enter your details, generate your targets, and build your first meal plan.
CHECK-IN PRO
Once your targets are set, Check-In Pro is where the system comes to life. Log daily, review weekly, and let the data guide your decisions.
The system does not require perfection. It requires consistency. Start today.

UNCOMMON Training Systems
Structuring the Stimulus
Before you begin the program, it is important to understand what the training is actually designed to do and how it fits into the bigger picture.
A lot of people approach training by trying to do as much as possible as quickly as possible. They train hard for a few weeks, constantly change exercises, add unnecessary volume, or chase exhaustion every session because they think feeling destroyed means the program is working. Usually, all this does is create inconsistency, poor recovery, and frustration. The goal of this system is different. The objective is to create a structured and repeatable approach to training that you can realistically sustain long enough for your body to adapt and progress over time. That progression is what produces meaningful change in body composition, strength, fitness, and overall performance.
The training inside this system is designed to work alongside the nutrition structure, not separately from it. Nutrition creates the environment for change, while resistance training helps determine how your body responds to that change. When you are in a calorie deficit, resistance training becomes even more important because it helps preserve lean muscle tissue while losing body fat. Without resistance training, weight loss can often include a greater amount of muscle loss, which can negatively impact strength, recovery, metabolism, and overall body composition over time. The goal is not simply to burn calories. The goal is to improve your body's ability to perform, recover, and adapt while building a stronger and more capable physique over time.
The programs inside this system are built around the FITT principle. This stands for Frequency, Intensity, Type, and Time.
Frequency refers to how often you train each week. Consistency will always outperform extremes. A realistic training schedule that fits your lifestyle is more effective than an aggressive approach that cannot be maintained long term. This is why there are multiple training splits within the system. The best program is the one you can consistently complete and recover from.
Intensity refers to how hard you train. This system uses RPE, or Rate of Perceived Exertion, to help guide effort levels during working sets. Instead of randomly selecting weights or training purely by feel, RPE gives you a practical way to judge how challenging a set should feel while still maintaining good technique and control. An RPE of 6 would feel relatively comfortable with several repetitions left in reserve. An RPE of 7 to 8 should feel challenging but controlled. An RPE of 9 means you are approaching your limit while still maintaining proper execution. Most working sets in this system will sit around an RPE of 7-9. The objective is not to reach complete failure on every set. The objective is to create enough stimulus for progression while still being able to recover properly between sessions. Once technique starts significantly breaking down, the set is finished.
Type refers to the style of training you are performing. These programs are based around structured resistance training using machines, cables, dumbbells, and selected free-weight exercises within a commercial gym environment. The exercises have been selected to create a balance between effectiveness, safety, simplicity, and long-term progression.
Time refers both to the duration of the training sessions and your consistency across weeks and months. Each session is designed to be completed in approximately 60 minutes including rest periods. This keeps the training practical and sustainable alongside work, family, and day-to-day responsibilities. The goal is not to spend endless hours in the gym. The goal is to perform enough quality work to create progress while still recovering properly.
This is where volume becomes important. Volume is essentially the amount of quality training work you perform. More volume is not automatically better. Performing excessive exercises, constantly adding more sets, or training to complete exhaustion every session usually reduces recovery and makes progression harder to sustain. The goal is to perform enough quality working sets to stimulate progress while still recovering properly before the next session.
All sets listed inside the training program are working sets and do not include warm-up sets. Before your first working set on most exercises, complete 1 lighter warm-up set to prepare the movement and gradually increase the load. Larger compound movements such as leg press, hack squat, or Romanian deadlifts may require 2 lighter warm-up sets depending on the weight being used. The purpose of warm-up sets is preparation, not fatigue.
Progression inside this system is intentionally simple. The goal each week is to improve slightly over time. That improvement may come from performing more repetitions with the same weight, improving control and technique, or gradually increasing load once you consistently reach the top end of the prescribed rep target at the required RPE.
For example, if the target rep range is 10-12 reps across 3 sets:
10/10/10 → 11/11/11 → 12/12/12
Once you can consistently complete all sets at the top end of the rep target with good technique and the correct RPE, increase the weight slightly and repeat the process again. Small improvements repeated consistently create significant change over time.
This is also why the exercises remain relatively stable across the 8 weeks. Repeating movements consistently allows your technique, confidence, coordination, and strength to improve over time. Constantly changing exercises makes progression harder to track and usually slows long-term progress.
Cardio is also included within the system, but it is important to understand its role correctly. The purpose of cardio is not punishment. It is there to support cardiovascular fitness, recovery, energy expenditure, overall health, and fat loss. The recommendation within this system is low-intensity steady-state cardio performed for 30 minutes per session. This can include incline treadmill walking, cycling, outdoor walking, or similar continuous low-impact cardiovascular work.
For most people, a heart rate range of approximately 120-140 bpm is a good target for Zone 2 cardio. The intensity should feel controlled and sustainable rather than maximal. You should finish cardio feeling like you could continue if needed, not completely exhausted. This type of cardio is different from general daily steps or incidental movement. Daily step targets are still important, but structured cardio is intentional cardiovascular training performed for a dedicated period of time at a higher sustained intensity. Depending on your goal, recovery, and activity levels, cardio frequency may vary across the week. Someone focused more heavily on fat loss may benefit from a higher frequency than someone primarily focused on general health or performance.
Recovery itself is one of the most overlooked parts of progress. Your body does not improve while you are training. Training provides the stimulus. Recovery is what allows the adaptation to occur afterward. Sleep, hydration, stress management, nutrition, and overall consistency all directly influence how effectively your body responds to the program. This is why the broader system tracks factors such as sleep, stress, hydration, calorie adherence, training completion, cardio completion, and daily activity levels. These variables provide context around performance, recovery, and progression over time.
Progress is also rarely perfectly linear. Some weeks you will feel stronger than others. Some sessions will feel easier than others. This is normal. The objective is not to have perfect workouts every time. The objective is to continue progressing over the long term while staying consistent with the process.
The best training program is not the most advanced one. It is the one you can consistently recover from, follow properly, and sustain long enough for progression to occur.
Over the next 8 weeks, focus on consistency rather than perfection. Show up, execute the fundamentals properly, track your progress honestly, and allow the process enough time to work. Results come from repeating the fundamentals long enough for adaptation to occur.
That is the process you are stepping into now.

Training Programs
Three structured 8-week programs are included within this system. Each is designed around the same principles covered above and differs only in training frequency and structure. Choose the program that best fits your schedule, recovery capacity, and experience level.
FULL BODY
Designed for beginners, returning lifters, or anyone wanting a structured approach to training without spending hours in the gym. Each session trains the entire body while keeping overall fatigue manageable.
UPPER LOWER
Designed for people who can consistently commit to four training sessions each week and want to increase overall training volume while still keeping sessions manageable and structured.
PUSH PULL LEGS
Designed for people who have more training availability each week and enjoy training with slightly higher frequency and overall volume. More training days does not automatically mean better results - this program is only effective if recovery, sleep, nutrition, and consistency are also managed properly.
Book Your Consultation
Your purchase is confirmed. Use the link below to book your consultation. We will use that session to build your personalised nutrition plan, training program, and set up your 7-day WhatsApp support.
Book your consultationThis link will be deactivated after use. If you cannot find a suitable time, contact me directly on WhatsApp.
The information contained in this guide is provided for educational and informational purposes only. The content is intended to support informed decision-making regarding nutrition and personal health practices.
This guide does not provide medical advice, diagnosis, or treatment. The author and publisher are not medical professionals and nothing within this document should be interpreted as a substitute for professional medical guidance. Individuals with existing medical conditions, metabolic disorders, injuries, eating disorders, or other health concerns should consult a qualified healthcare professional before making significant changes to diet, exercise, supplementation, or lifestyle practices.
The nutritional calculations, calorie targets, macronutrient allocations, and other quantitative outputs discussed throughout this document are estimates derived from commonly accepted physiological models. Because individual physiology varies significantly between people, the outputs generated by these methods cannot guarantee precise results or identical outcomes for every individual.
By choosing to apply the information contained in this guide, the reader acknowledges that all decisions regarding diet, training, supplementation, or lifestyle practices are undertaken voluntarily and at their own discretion. The author, publisher, and any associated entities shall not be held liable for any injuries, health complications, adverse outcomes, or damages that may result from the use or misuse of the information presented within this guide.
All content contained within this guide, including but not limited to written material, system frameworks, methodologies, calculations, and instructional structures, is the intellectual property of the author and UNCOMMON Coaching Systems. No portion of this guide may be reproduced, stored, transmitted, distributed, sold, or shared in any form without prior written permission from the author.
The purchase or access of this guide grants the reader a limited, non-transferable license to read and apply the information for personal use only. Commercial use, reproduction, redistribution, or repackaging without written permission is strictly prohibited.
By accessing, purchasing, or using this guide and any associated tools or systems, the reader acknowledges that they have read, understood, and agreed to the terms described in this legal notice and disclaimer.